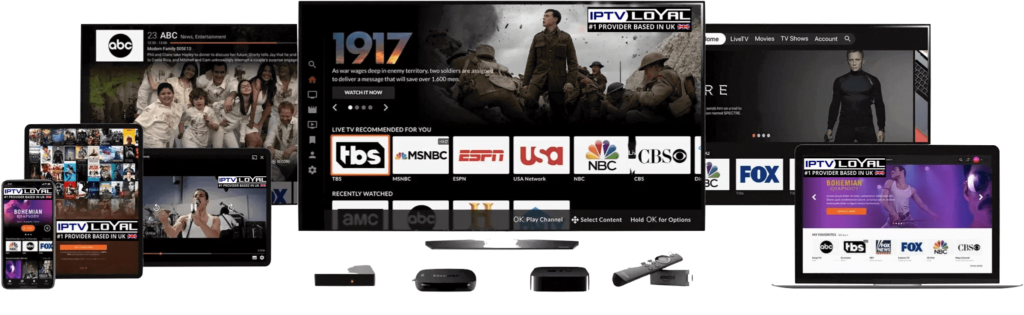
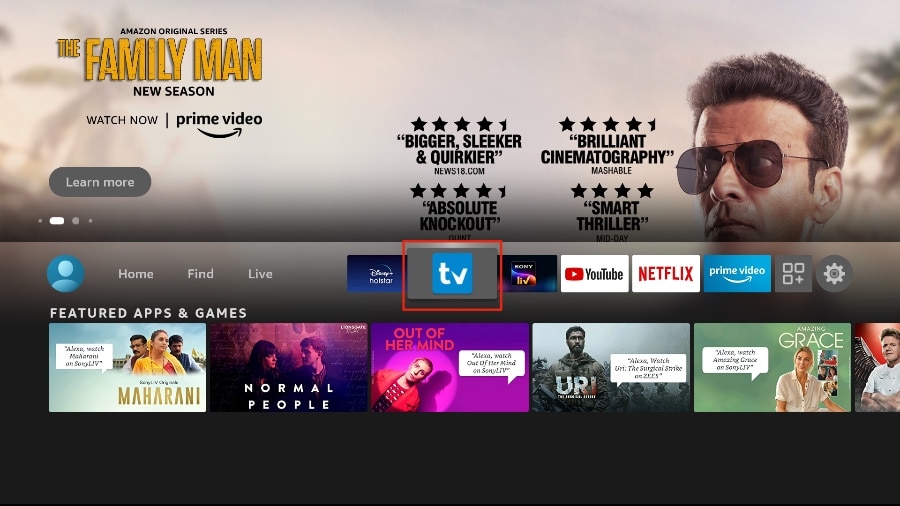
SMART TV
- Our service is compatible with any application, and this is the recommended applications
1st Application: IPTV Smarters PRO Application
Step 1: Open Google Play Store
Step 2: Search for “IPTV Smarters PRO” or Smarters player lite and install it :
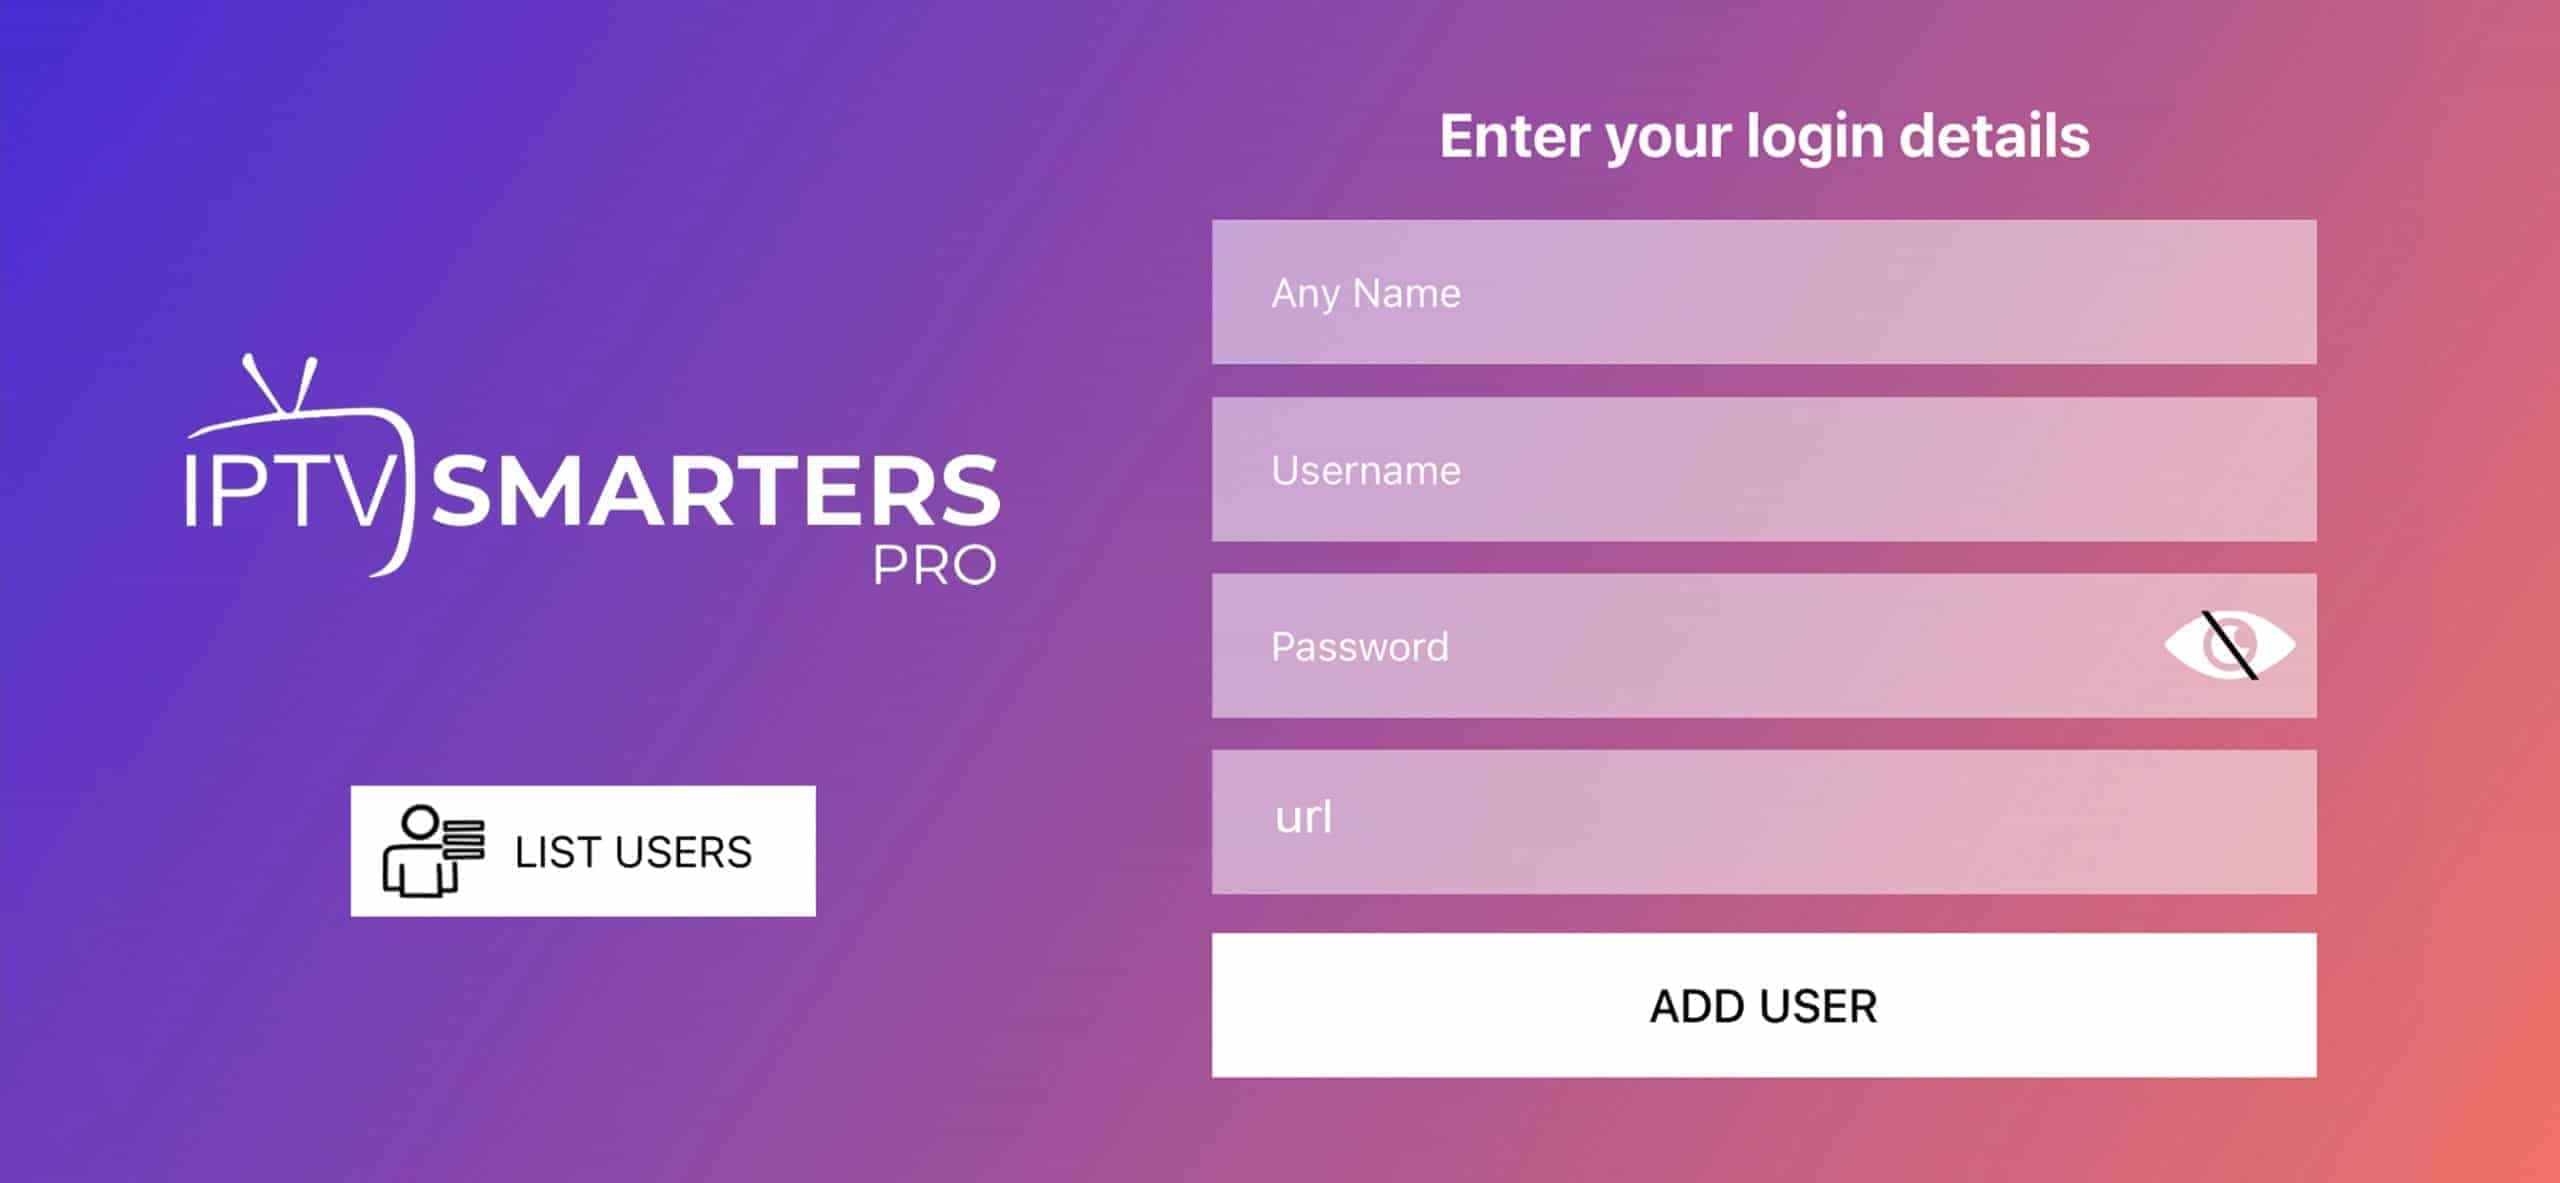
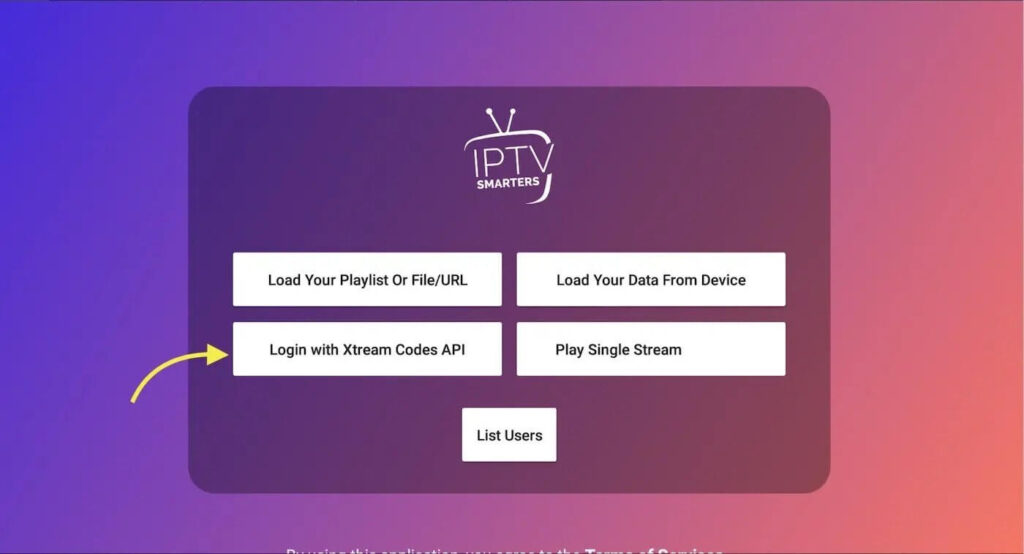
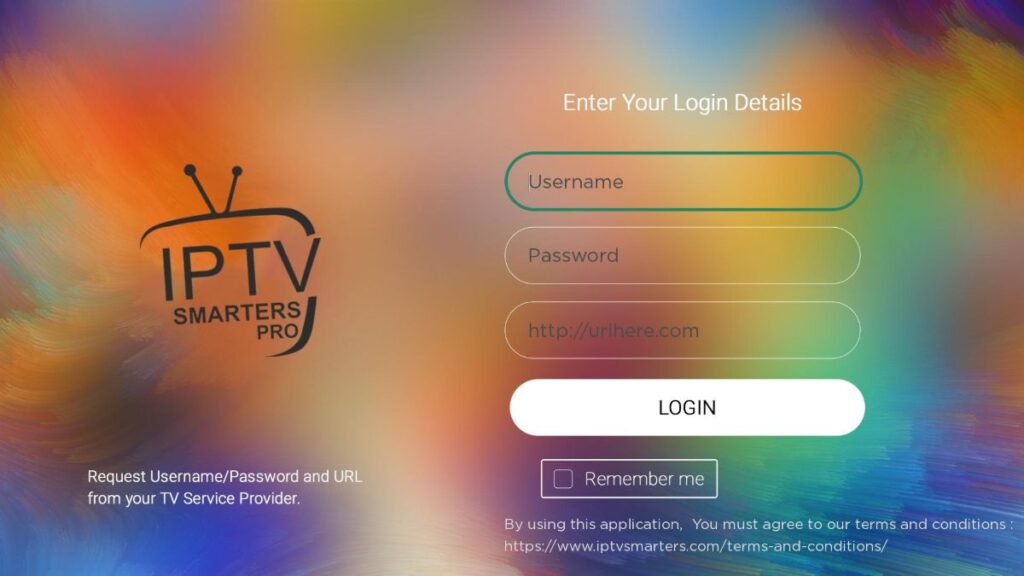
Step 3: Open IPTV Smarters PRO and click Login with Xtream Codes API

Step 4: Enter Xtream connection details
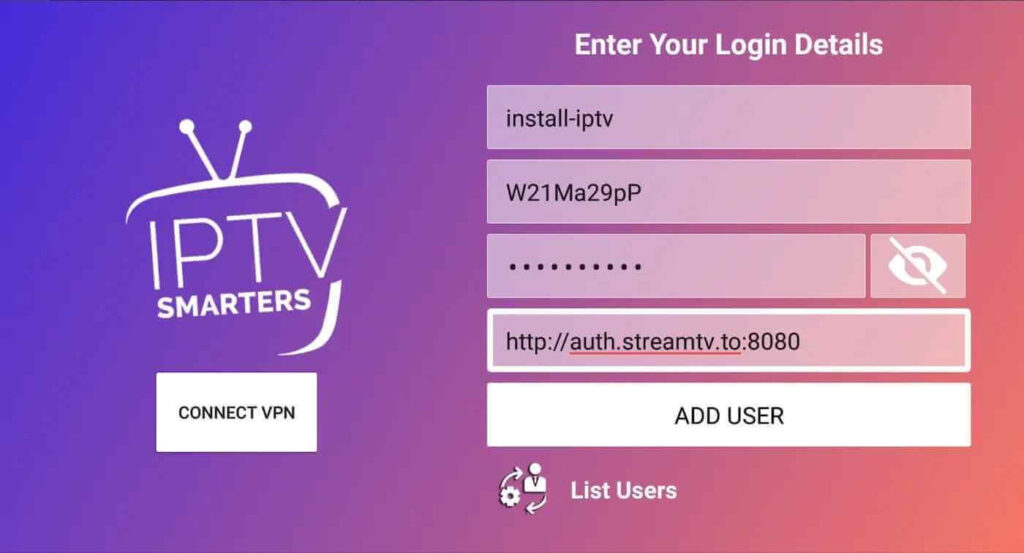
For the first field Choose a name for your list (it can be any name ), Then enter your username, password and URL we provided to you and click ADD USER

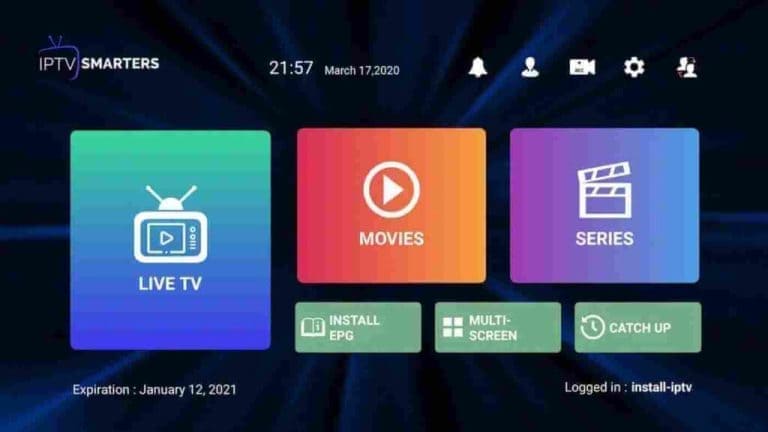
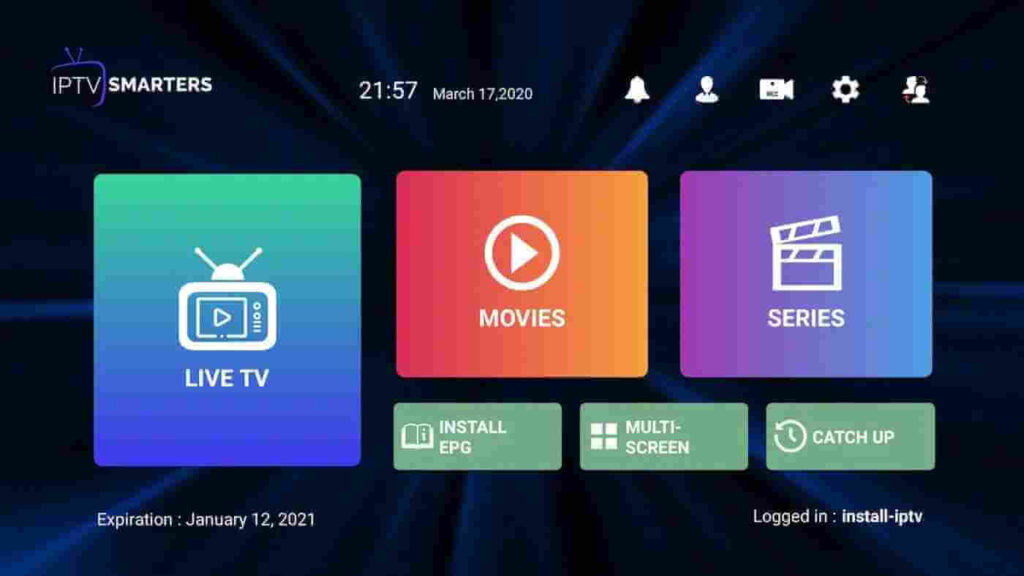
Step 5: It will start downloading channels and VOD about 10 seconds then you will be logged in and you will see this page
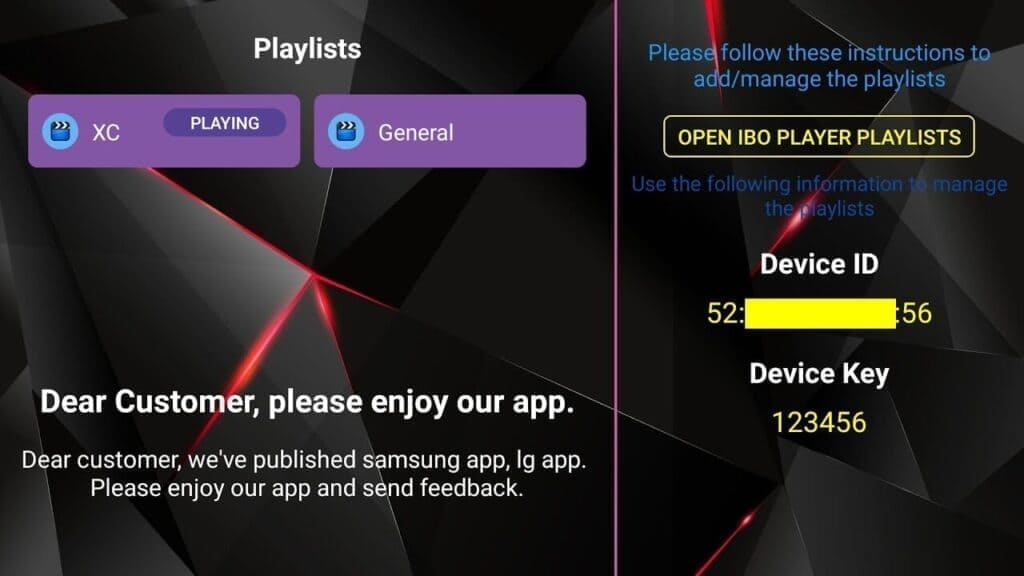
2nd Application : IBO Player Application
Step 1: Go to the Samsung or LG Smart TV app store screen and search for “IBO Player” application If the app is not displayed on the main screen you may have to search for it in ‘All Apps’ or ‘Updates’. If you still can’t find it please contact us.
Step 2: Launch the “IBO Player” app and make a note of the ‘Device ID’ and ‘Device Key’ which is displayed on the screen.
Step 3: Navigate to https://iboiptv.com/device/login and Enter the Device ID and Device key you noted in step 1, Then click on Login.
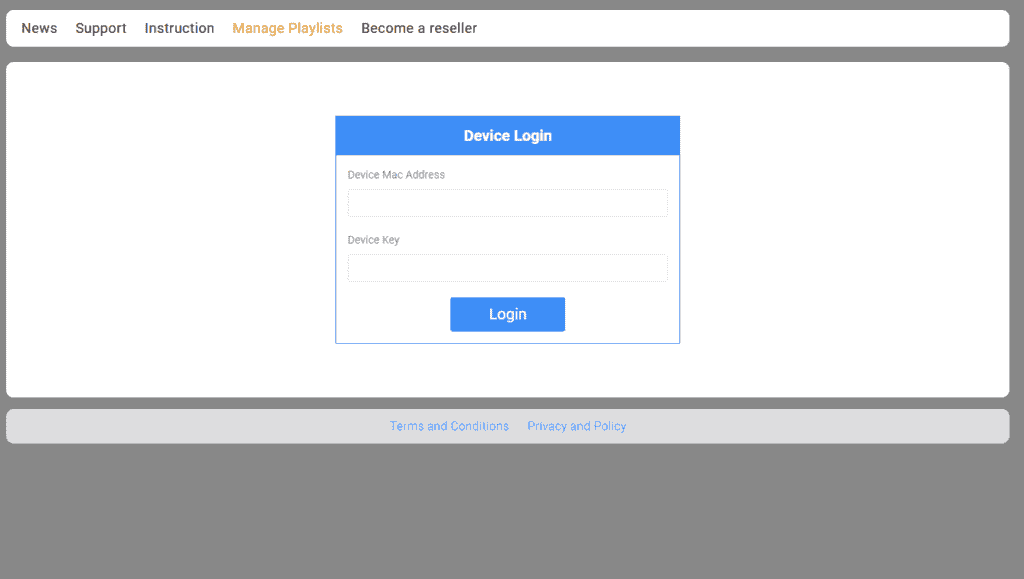
Step 4: Click (add XC Playlist) button and fill in your Xtream connection details (check your email for these details).
Enter Username, Password, and Host (Server URL of Xtream connection). Click on Save
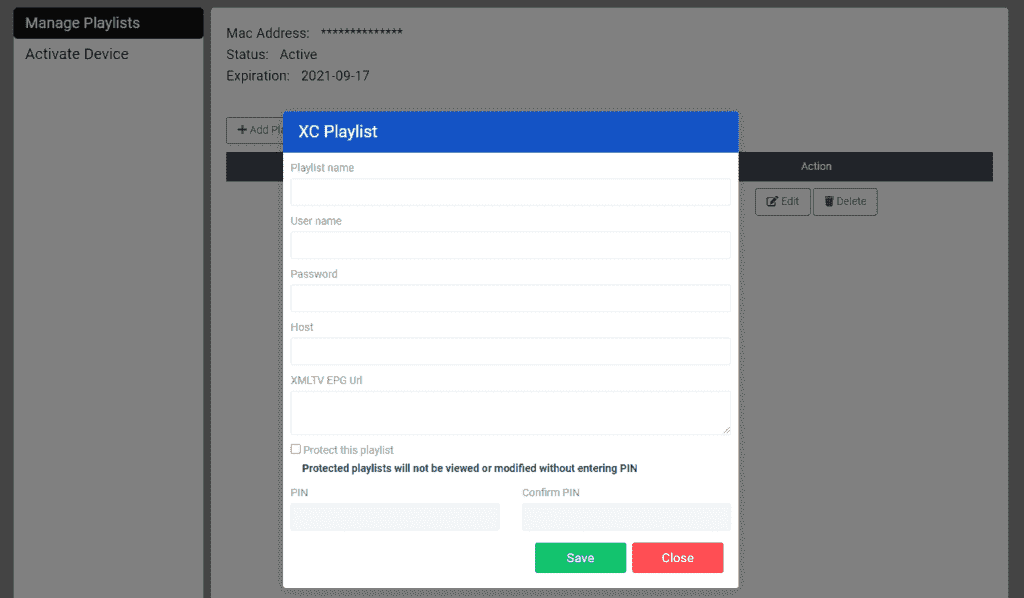
Step 5: Then back to the IBO Player application and choose Refresh to reload Playlists, Then the playlist name must appears
How to setup tivmate
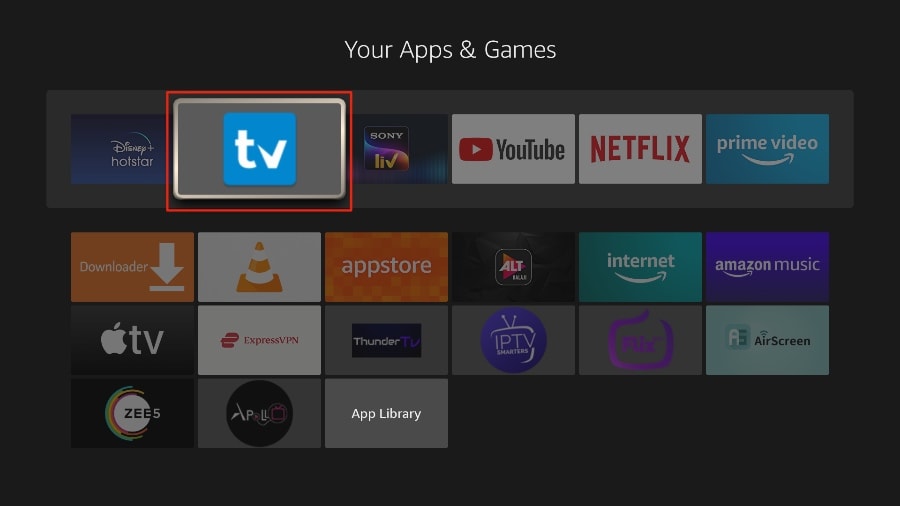
1. Open the TiviMate app.
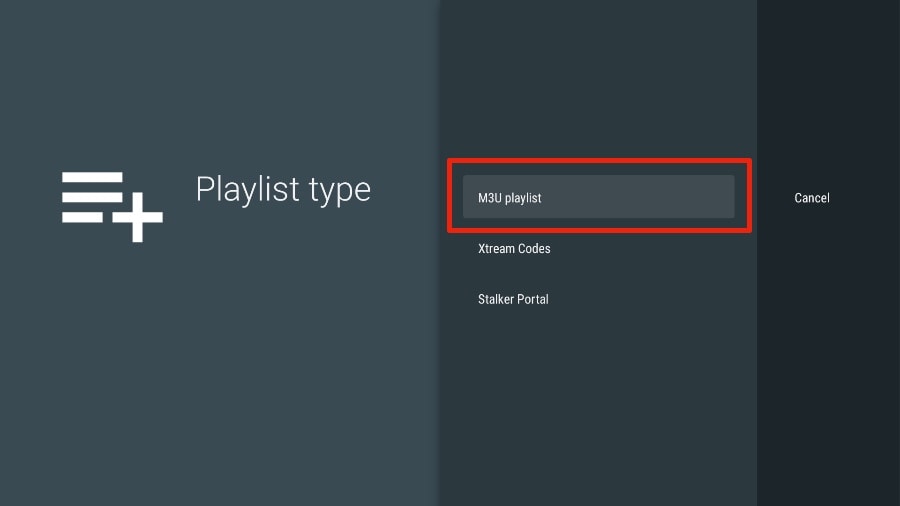
2. Select Add playlist.
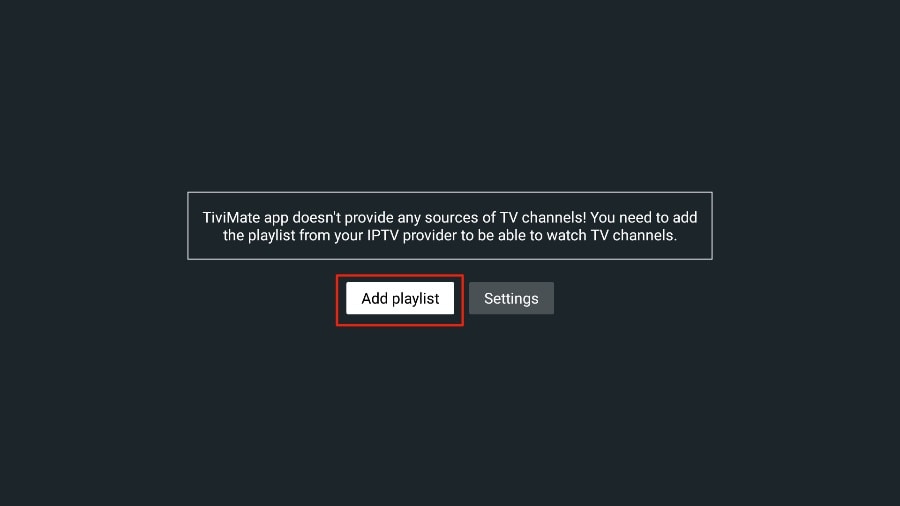
3. TiviMate will ask you to add a playlist using an M3U link, Xtream code, or Stalker Portal. Select the M3U playlist.
In this article, we will use an M3U link to play an IPTV service in the TiviMate app. When you subscribe to our IPTV service, you will receive an email with relevant login information and an M3U link. If you don’t get an M3U link, please contact our customer suppor.
4. TiviMate will ask for your M3U link. Enter your M3U link and press Next.

5. TiviMate will load the IPTV service and offer a peek at the number of channels and movies available in the IPTV package.
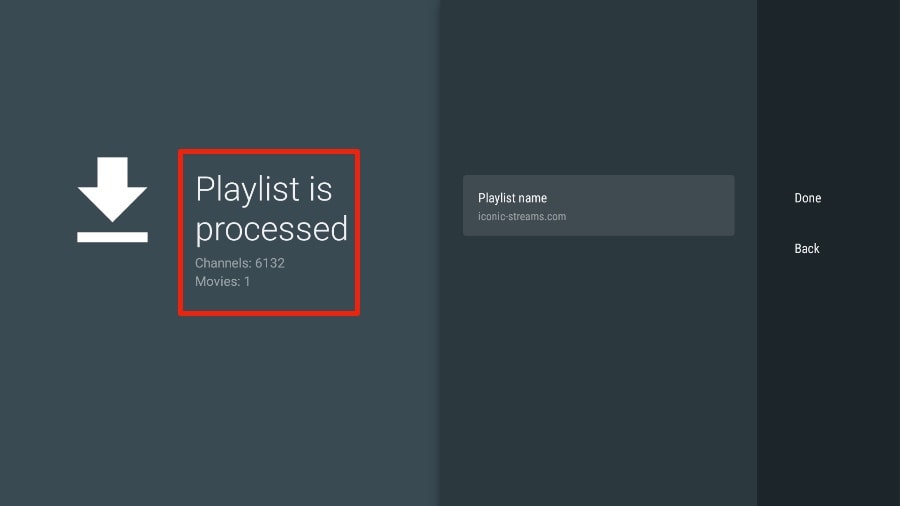
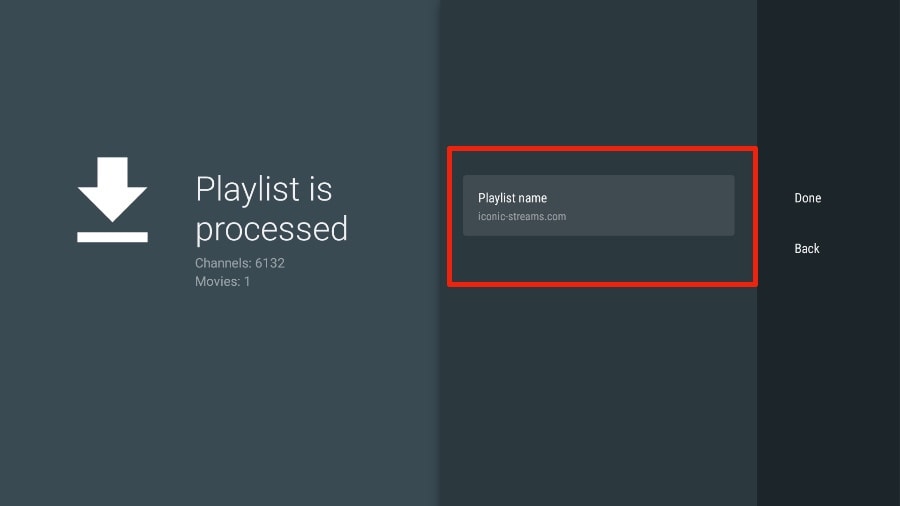
6. Add a Playlist name.
7. If the playlist is finished processing, select Done.
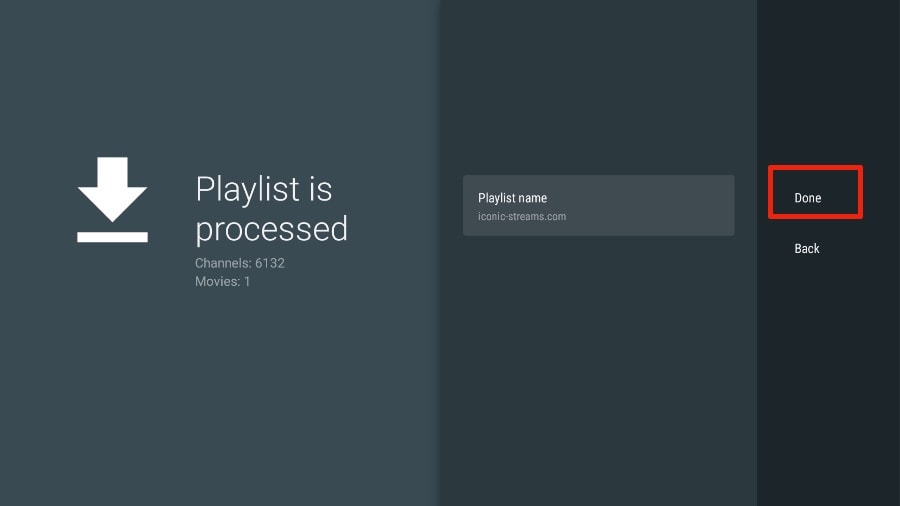
A minute or two later, you will see the IPTV service’s content appearing in the TiviMate app.
Our IPTV comes with a dedicated EPG (electronic program guide), as shown below.
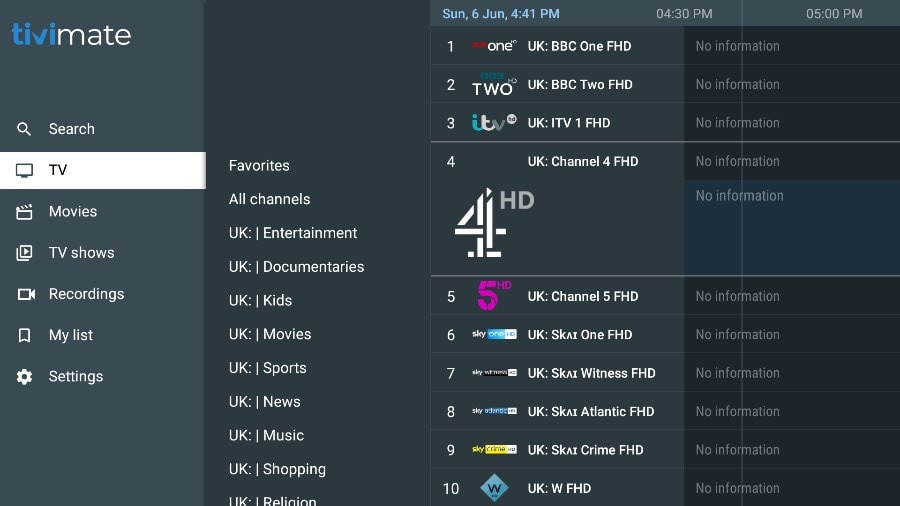
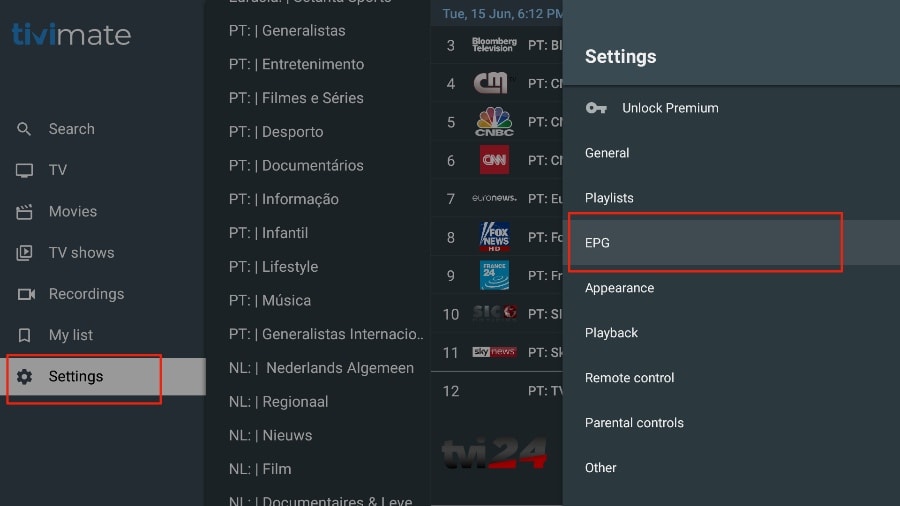
If you don’t see an EPG enabled in the TiviMate app, consider enabling it in the app’s Settings.
As I mentioned above, the major features of TiviMate are behind a paywall. You need to pay for the premium version to enjoy TiviMate at its greatest potential.
When you try to access any premium feature without a premium account, TiviMate will ask you to upgrade to premium. For example, when you try to add a channel to your list of favorites, TiviMate will prompt you to upgrade the app. If you wish to continue with the free version, you can hit Cancel and keep using the free TiviMate app on FireStick.
To purchase the premium version, you need to use the TiviMate Companion app from the Google Play Store. Here’s how to do it.
Tivimate App Subscription is not included in our plans.
FIRE TV STICK
How to Install IPTV Smarters Pro on Fire TV Stick
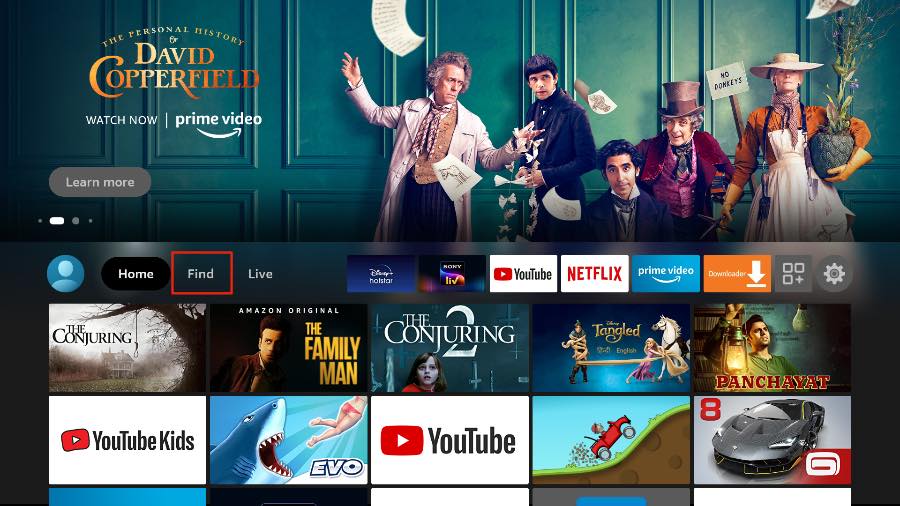
From the home screen of your device, hover over the Find option.
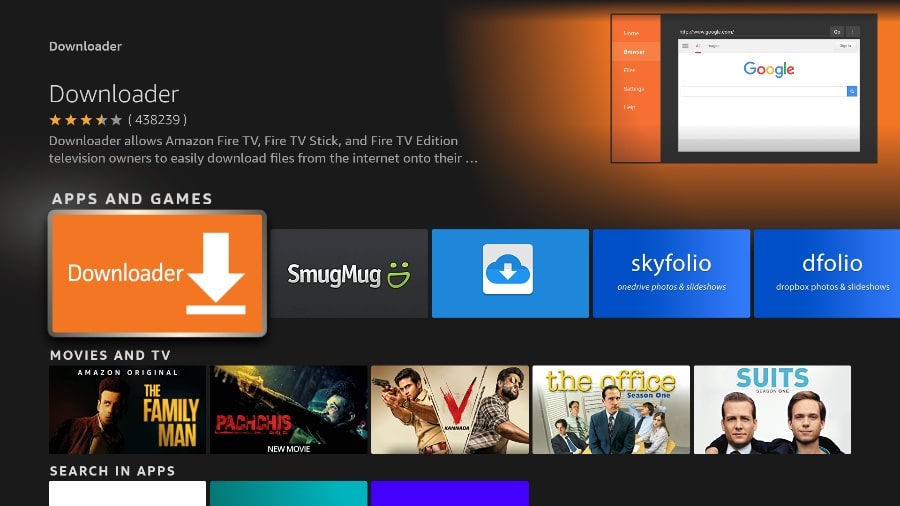
Step 1: We will first install the Downloader app
This app will help you sideload IPTV Smarter on FireStick (because browser downloads are not allowed)
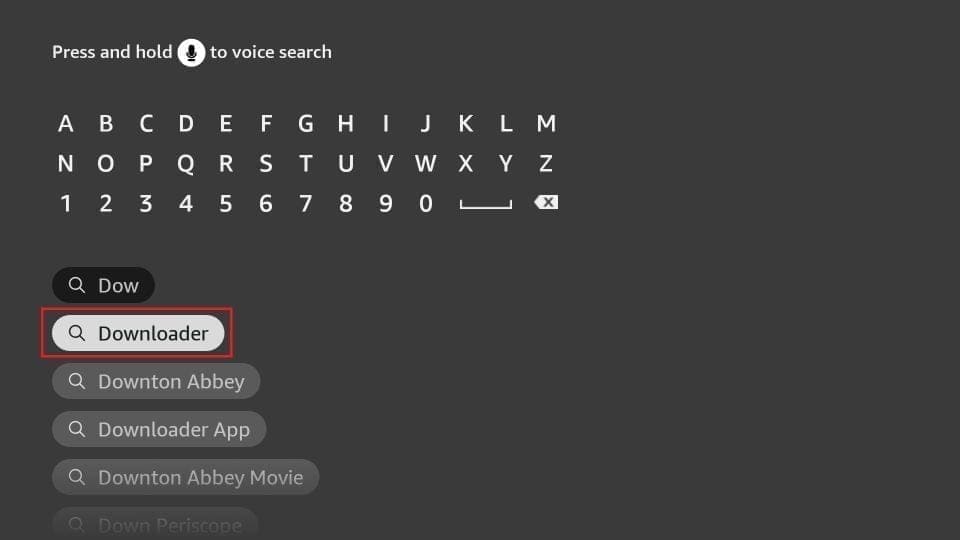
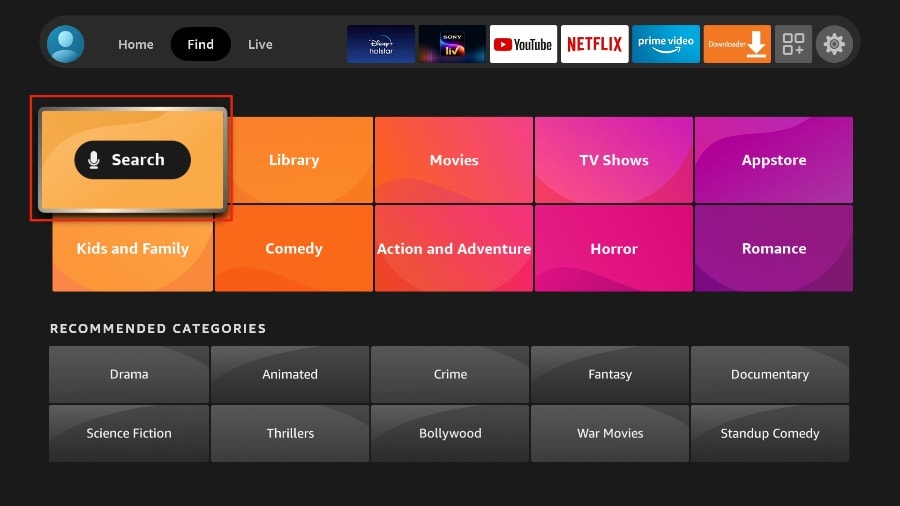
Step 2: Click the Find > Search option on the home screen of FireStick
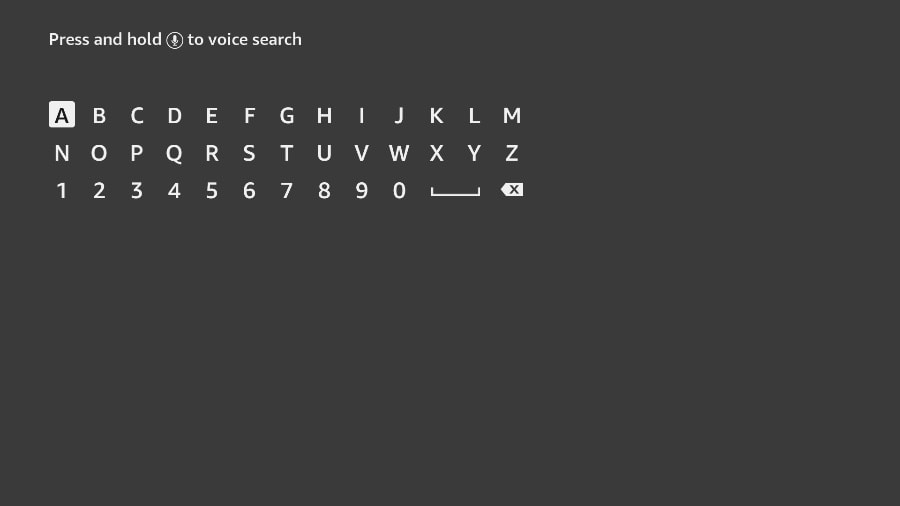
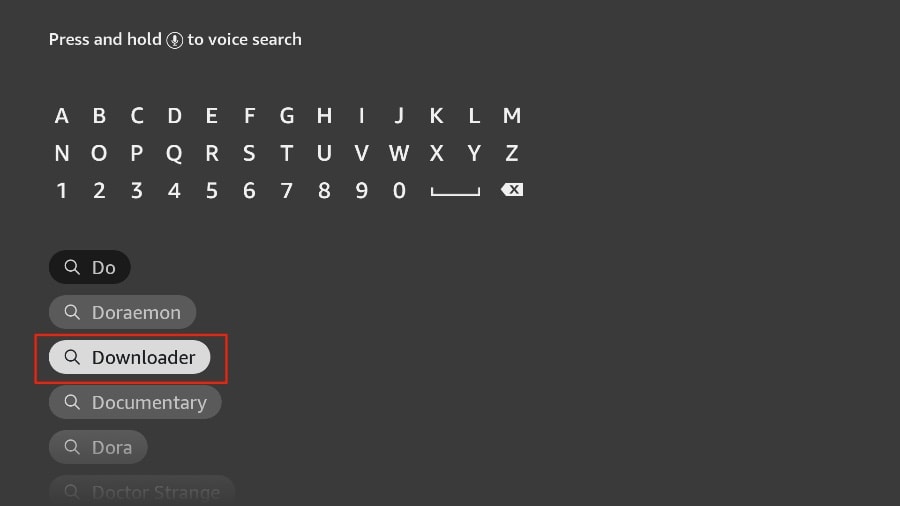
Step 3: Type the name of the app (which is Downloader)
Click the Downloader option when it is displayed in the search results
Choose the Downloader icon on the following screen and download and install the app
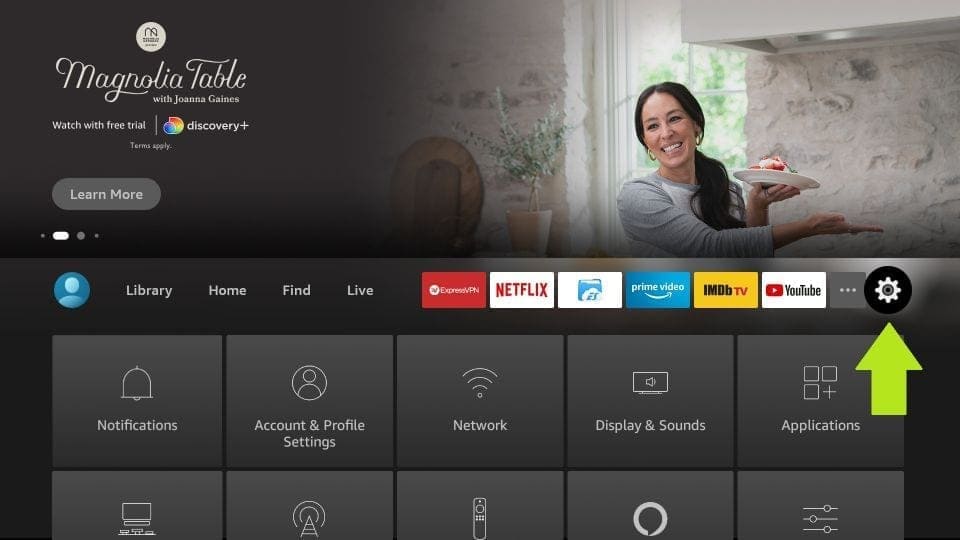
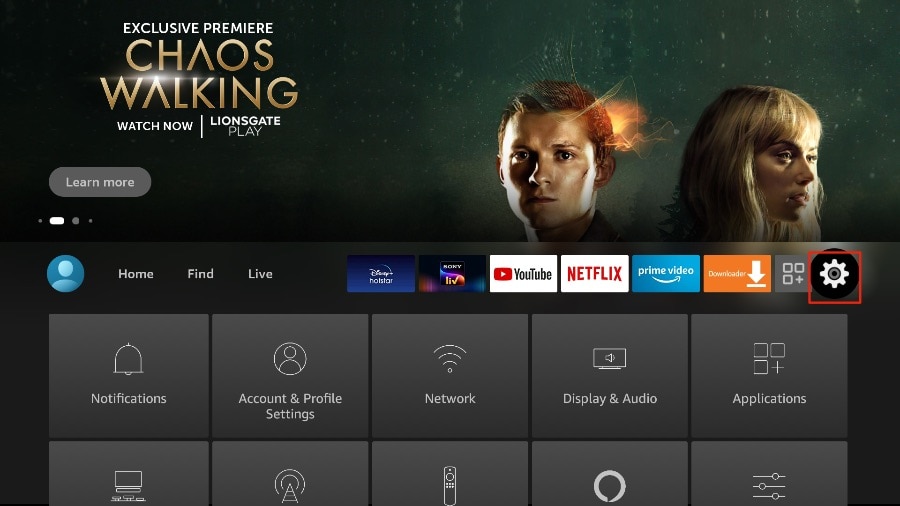
Step 4: Get back to the home screen of FireStick after installing the Downloader app
In the menu bar, click Settings
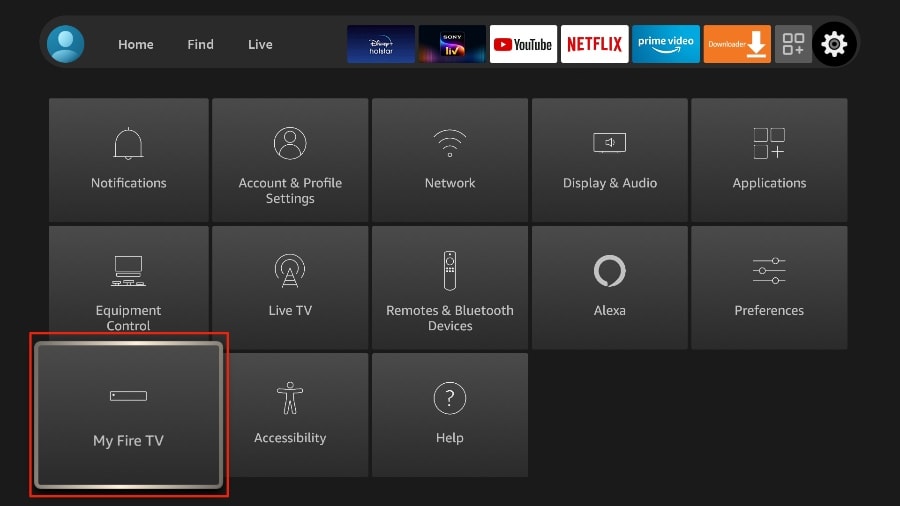
Step 5: In the Settings, choose the option My Fire TV
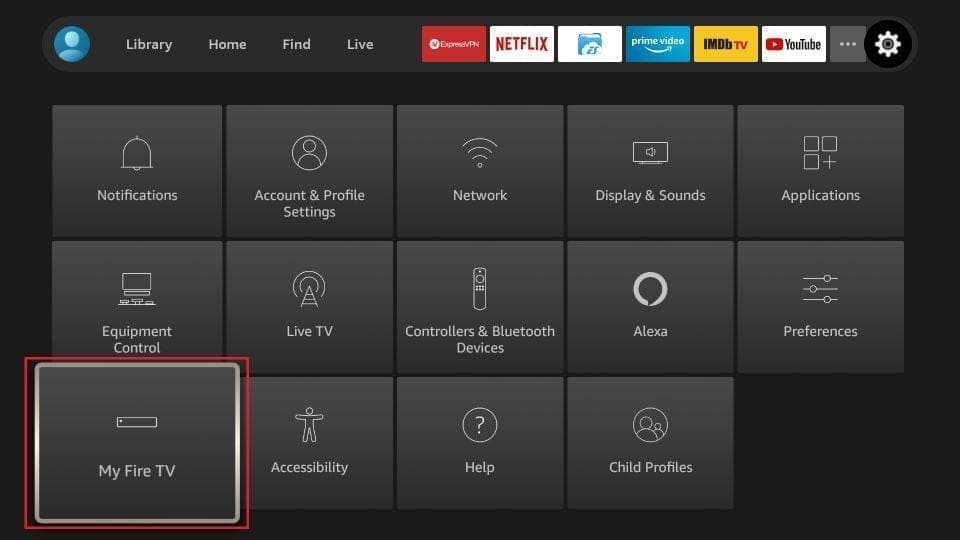
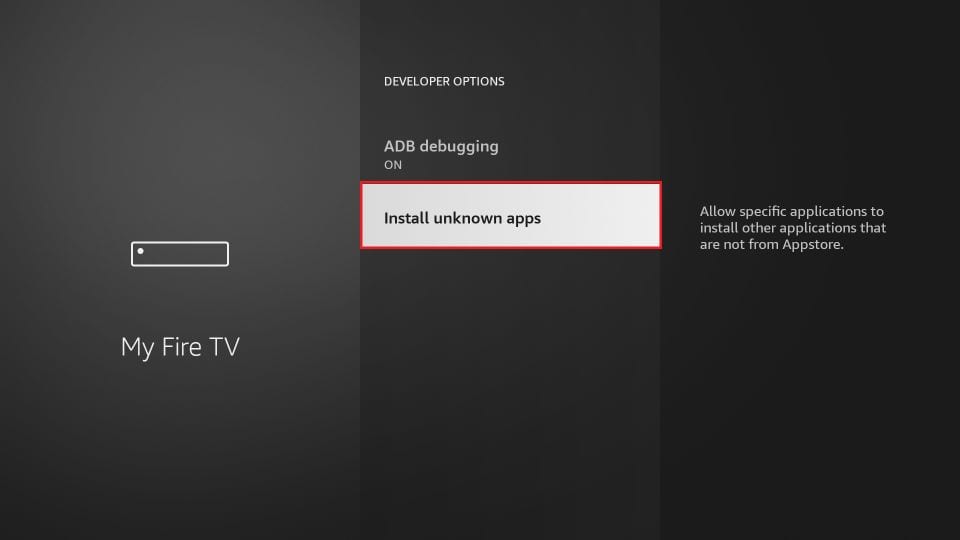
Step 6: When the following set of options are displayed on the next screen, click Developer Options
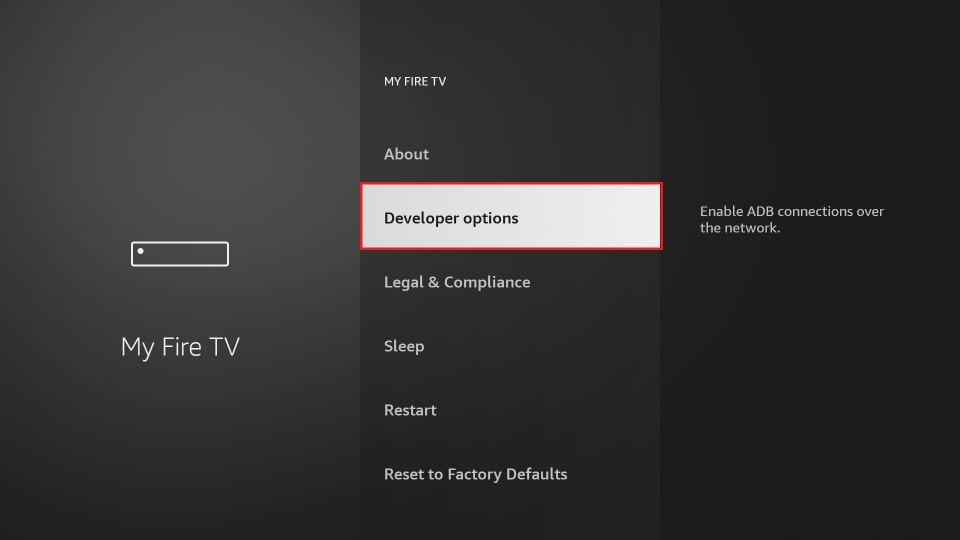
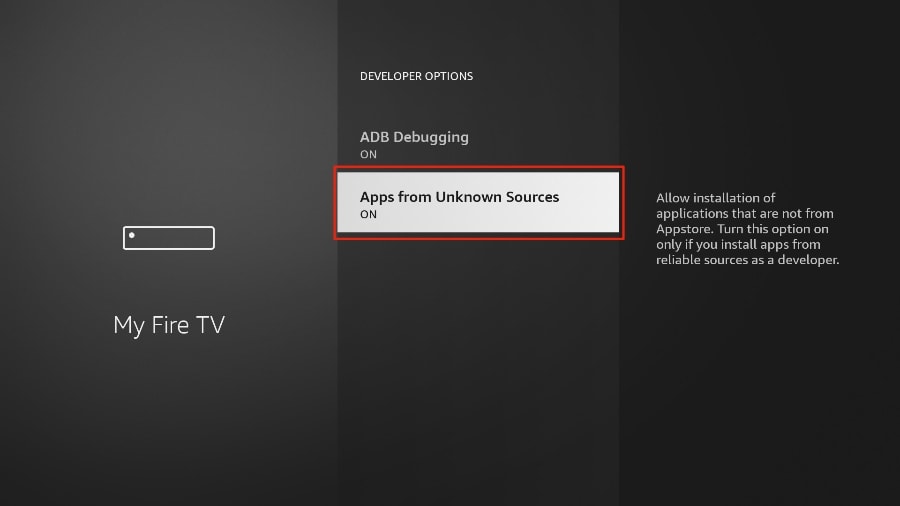
Step 7: Click Install from unknown apps
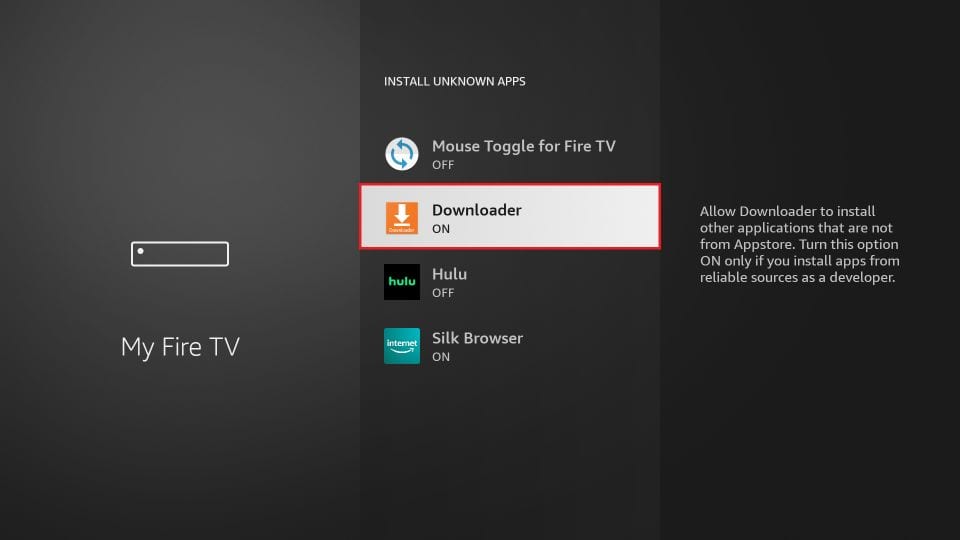
Step 8: Click Downloader to change the status to ON
With this, you have configured the FireStick settings to allow the installation of IPTV Smarters and other third-party apps. Follow the steps below:
Step 9: You may now open the Downloader app
When you run this app for the first time, a set of prompts will appear. Dismiss them until you see the following screen
On this screen, you need to click the URL textbox on the right side (make sure Home option in the left menu is selected) where it says ‘http://’
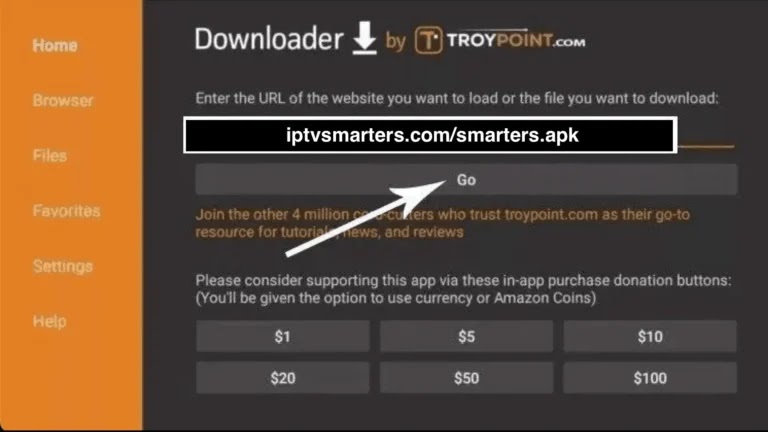
Step 10: Go ahead and enter the following path on this window: https://bit.ly/mainsmart
Click GO
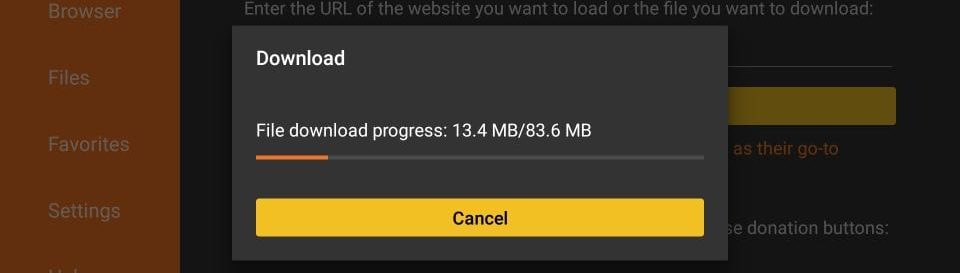
Step 11: Give it a minute or two until the IPTV Smarter is downloaded onto your FireStick device
Step 12: When the download has completed, the Downloader app will run the APK file and the installation will start
Click Install
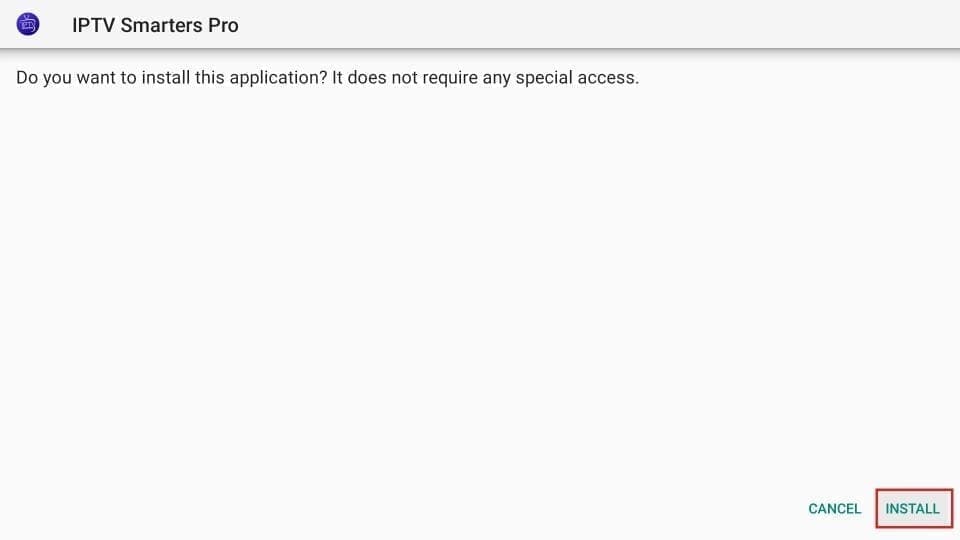
Step 13: Wait for the installation to finish
Step 14: Installation is concluded with the App installed notification
You may now choose to click OPEN and get started with IPTV Smarters
I recommend choosing DONE so that you may first delete the APK file and save some space on the FireStick storage
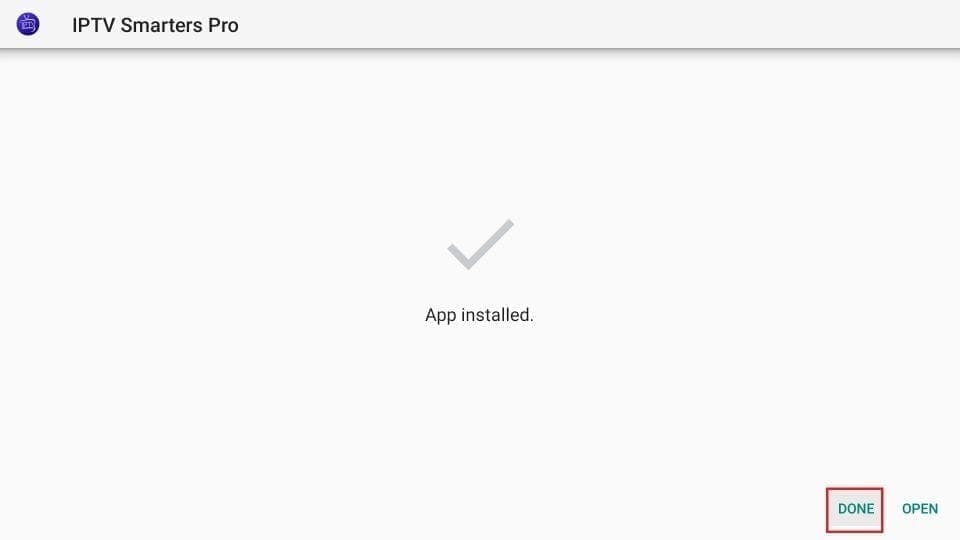
Step 15: If you clicked DONE above, you will be back on the Downloader interface
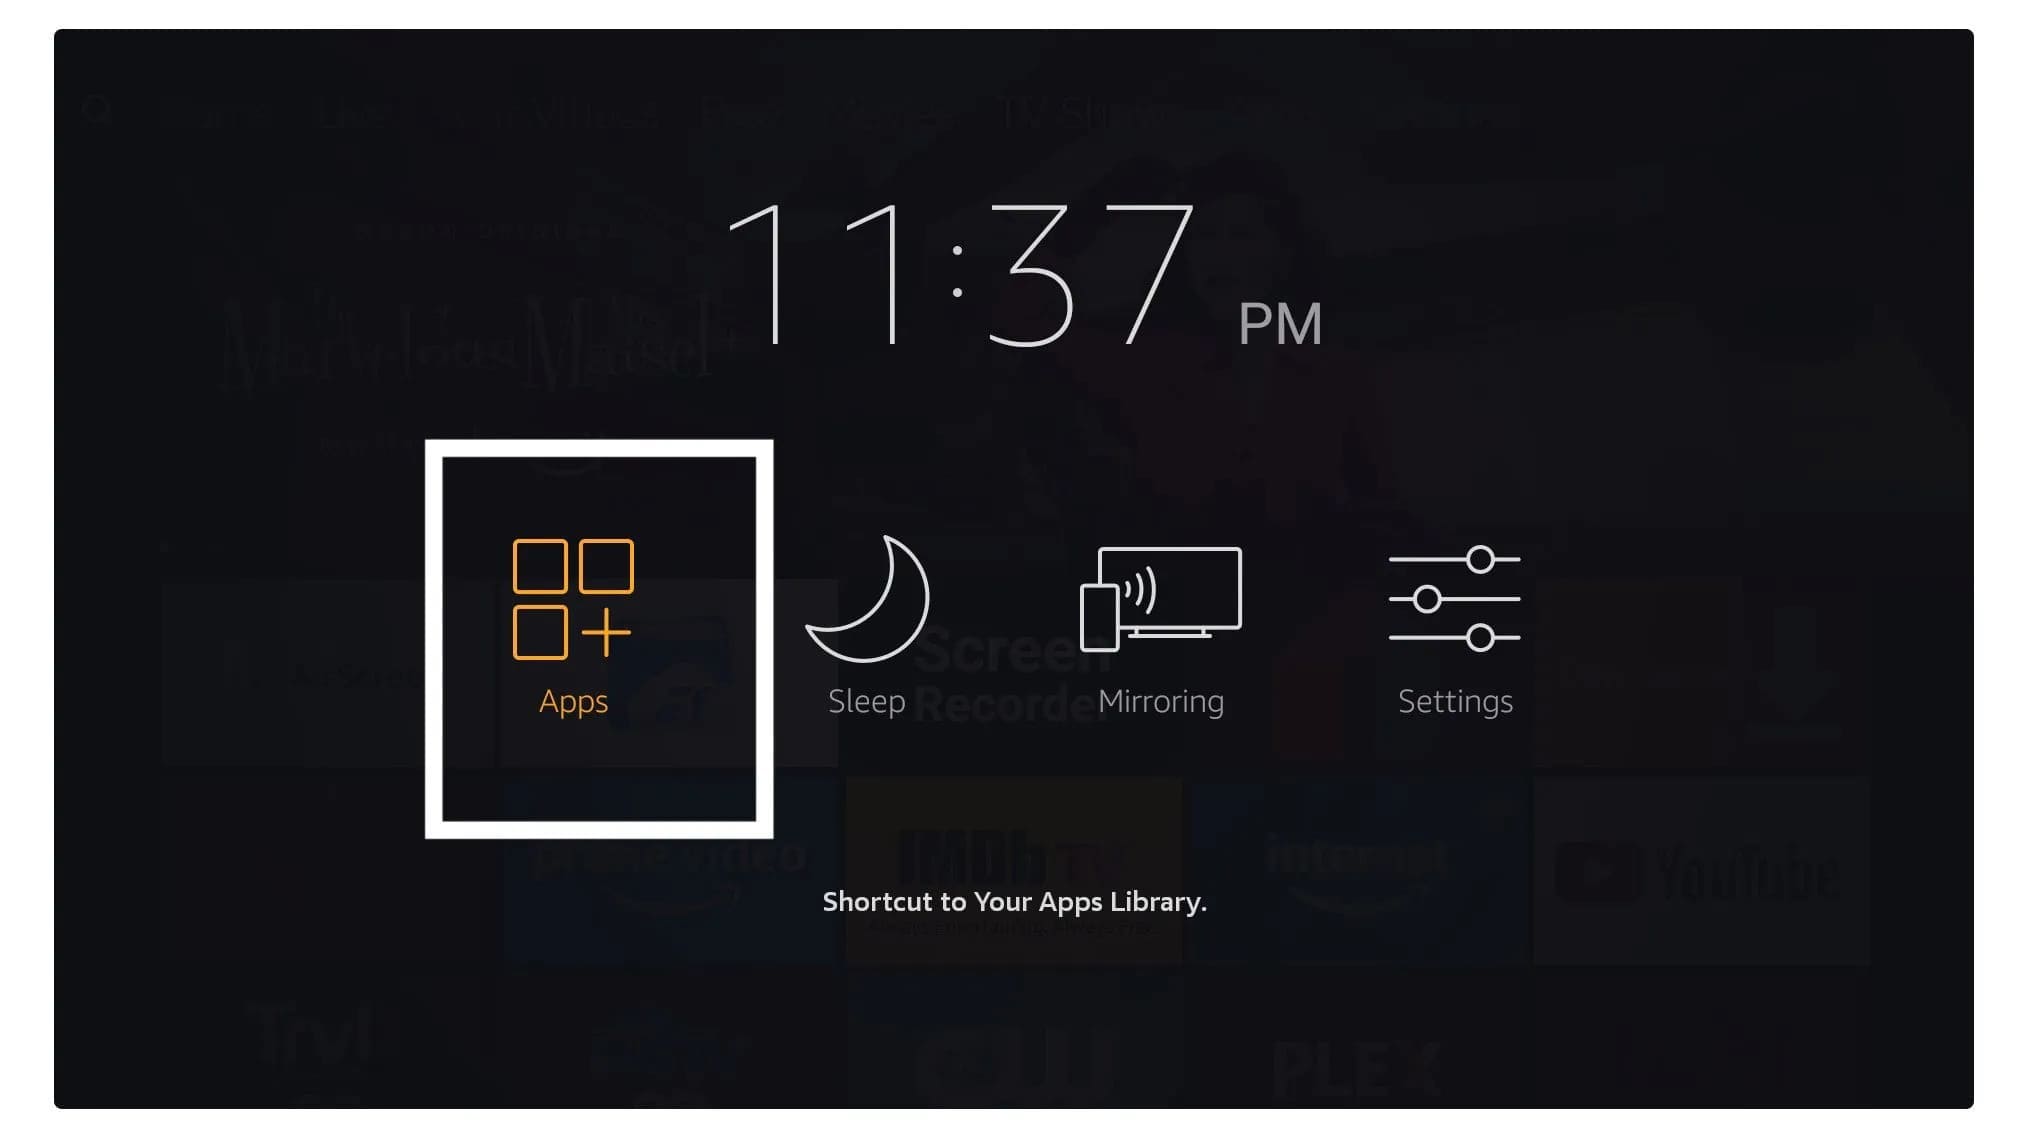
Click Delete
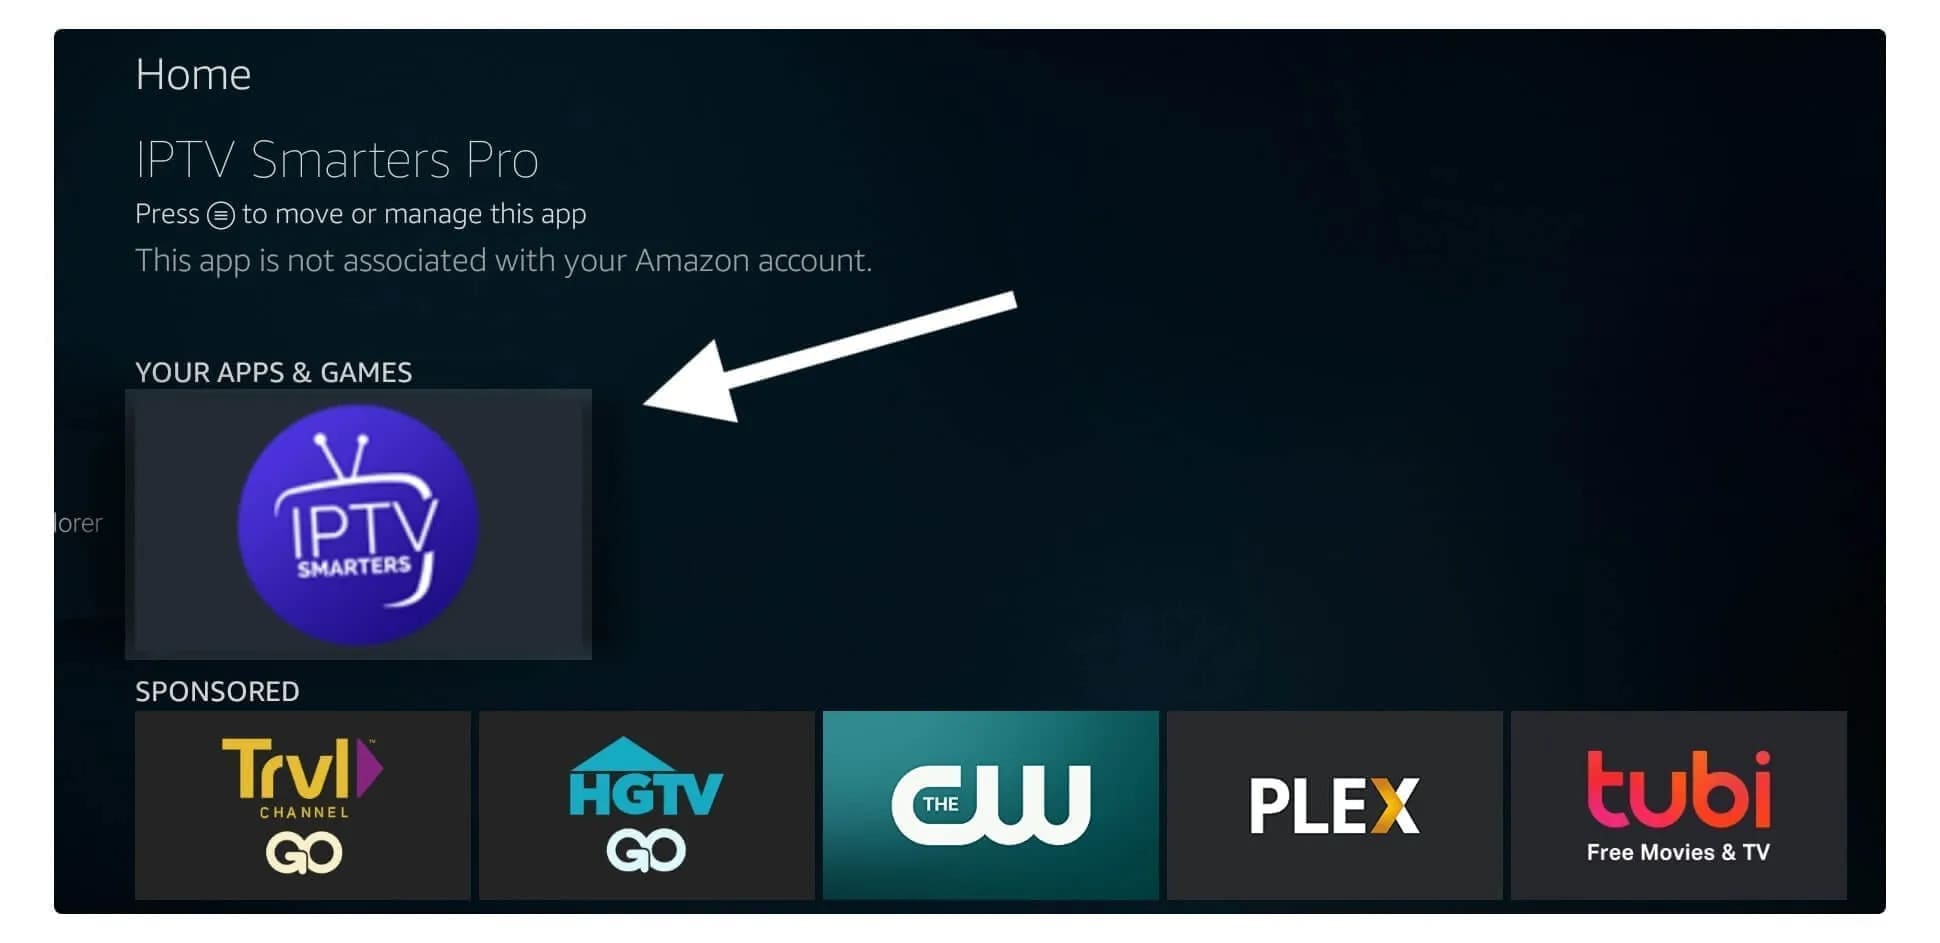
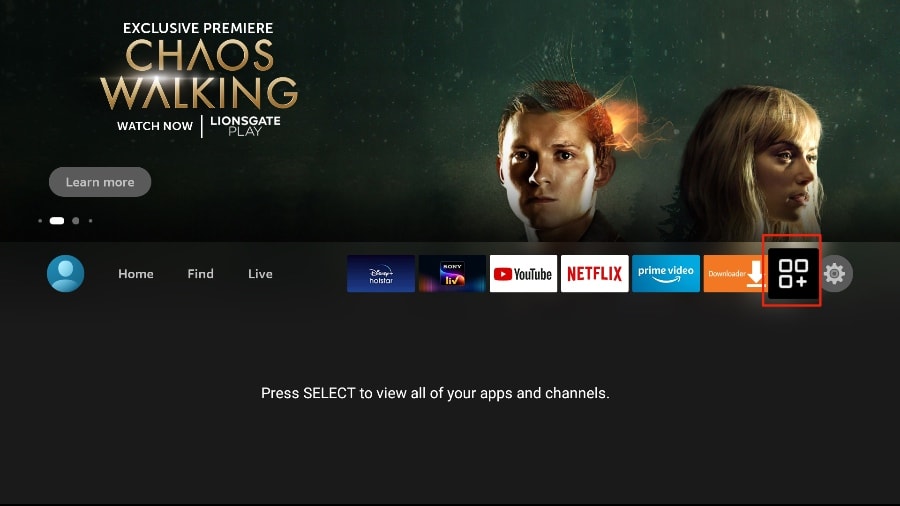
Step 16: Launch IPTV Smarters on Firestick either by going to Your Apps & Channels section or pressing & hold the Home button and then select Apps from the next screen.
Step 17: Scroll down and you will see the app appears at the bottom so press select to launch it.
Step 18: When launching it for the first time you will be asked to agree with their user agreement so simply click on the Accept button

Step 19: Once it’s done from the next you will be asked to Add a User so for this just click on the Add User button.

Step 20: From the next screen, you will notice multiple options to Log Into the Smarters Pro. Now you need to choose Login with Xtreme Codes API which is the fast method
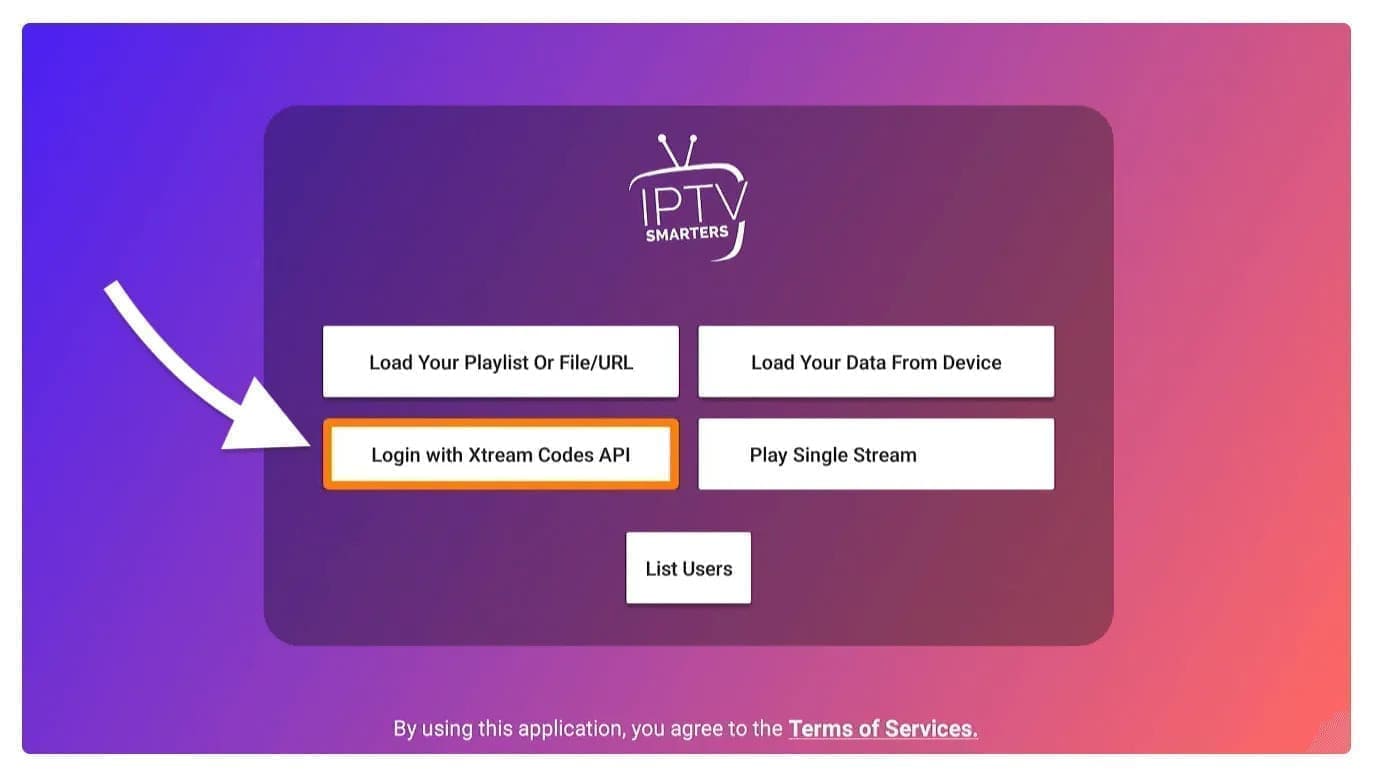
Step 21: After that you will notice various fields appear there so you need to fill them as follow:
- Any Name: Type the name of your user.
- Username: Write the username provided by the seller.
- Password: It is also provided by the IPTV provider.
- URL: Just copy the portal URL from the provider and paste it here.
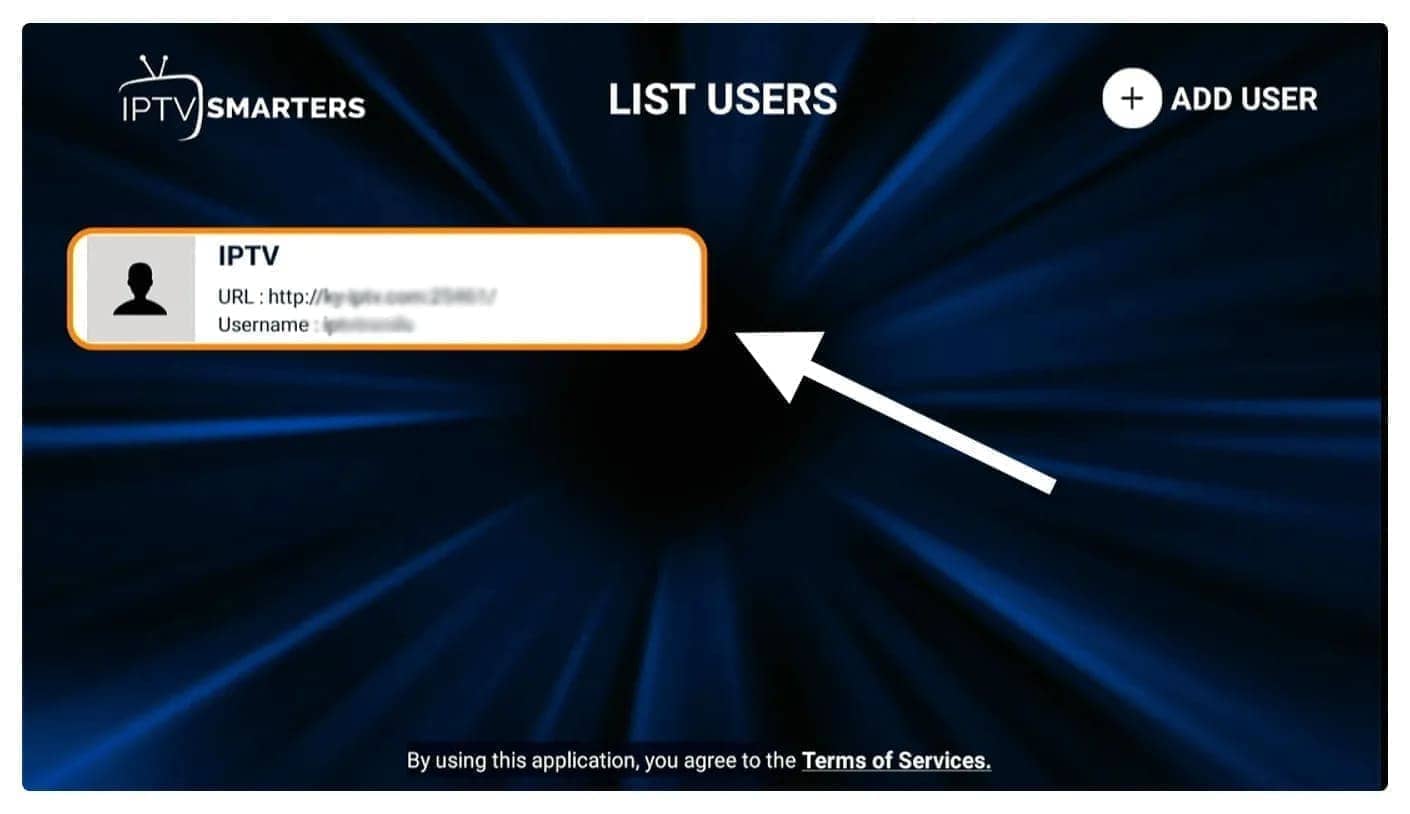
Step 22: Once you filled every field just click on the Add User and it will create a new profile

Step 23: After that, you will notice the user is listed on your screen so click the User that you created.
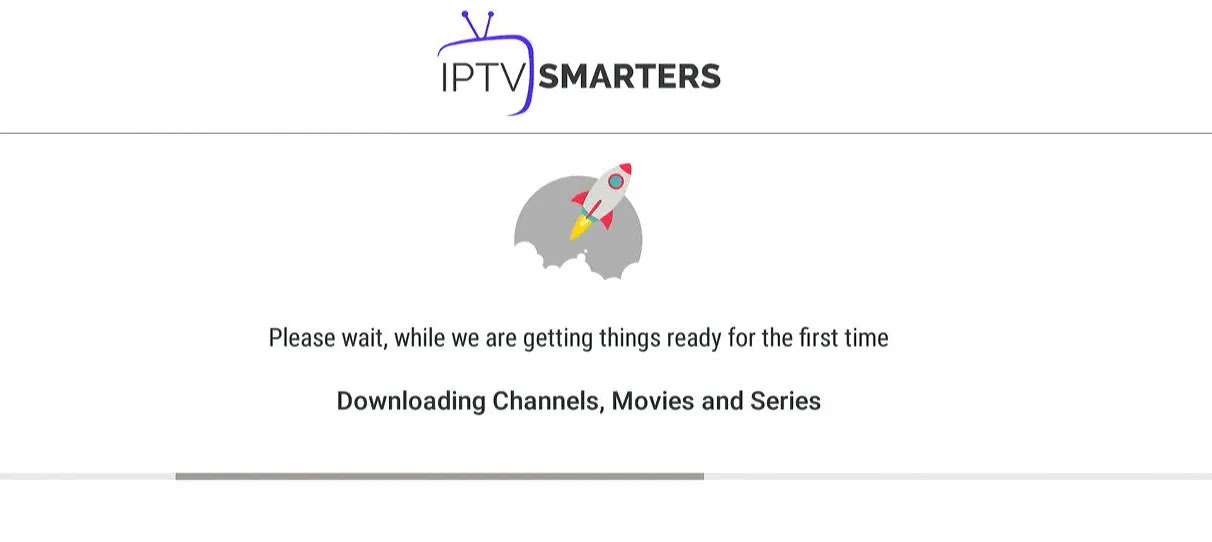
Step 24: From the next screen, it shows Downloading Live Channels, Movies, and TV Shows so just wait for a while until it completes.
Step 25: Once the downloading is completed a simple interface will appear with Live TV, Series, Movies, and other options. Now you just need to select any of these options and then it will Show Content available in that category.
FIRETICK:How to install Tivimate
Go through all three parts below to get TiviMate on FireStick.
Part 1: Get Downloader on FireStick
1. Open the FireStick home screen.
2. Go to the Find menu.
3. Select Search at the top.
4. It will open a virtual keyboard on your FireStick.
5. Start to type Downloader. Select Downloader when it shows up among the suggestions below the keyboard.
6. Select the Downloader app, which you can recognize by its orange background. Then, on the following screen, select the Get or Download button.
It will take a minute to install the Downloader app on your FireStick. Before you open the Downloader app to install TiviMate APK, you need to make changes in the FireStick settings menu. Otherwise, you will receive errors during installation.
Part 2: Change FireStick Settings
1. Press the home button on your FireStick remote.
2. Go to the settings gear on the far right.
3. Scroll down and select My Fire TV.
4. Choose Developer Options.

5. Find Apps from Unknown Sources. By default, it’s off. Select it to turn it ON.
Now you can comfortably sideload any app installation file (APK) on the FireStick without any issue. Follow the steps below to install TiviMate APK on the FireStick using the Downloader app.
Part 3: Use Downloader to Install TiviMate on FireStick
1. Go to the Apps menu from the FireStick home.
2. Open the Downloader app and select the Enter a URL box on the home screen.
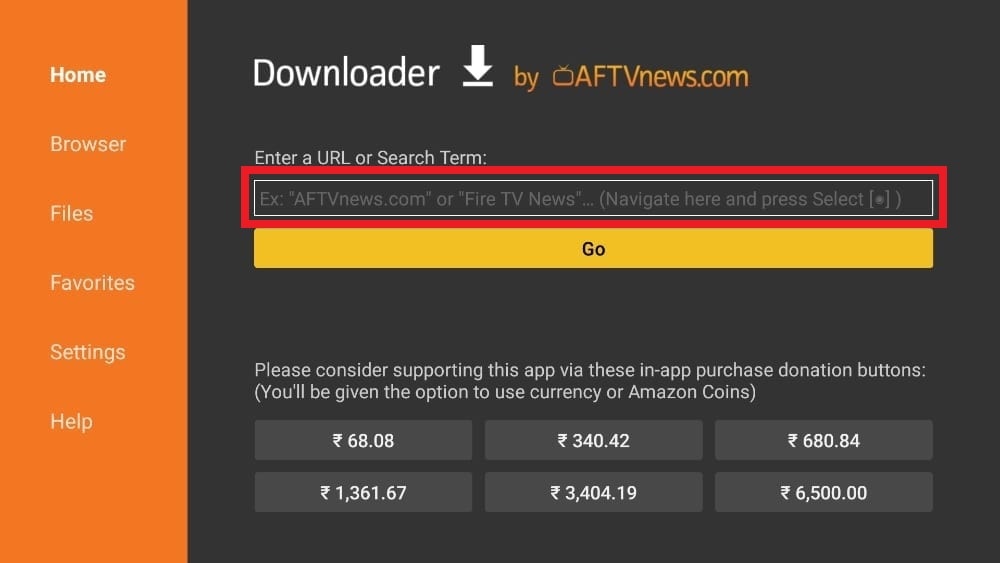
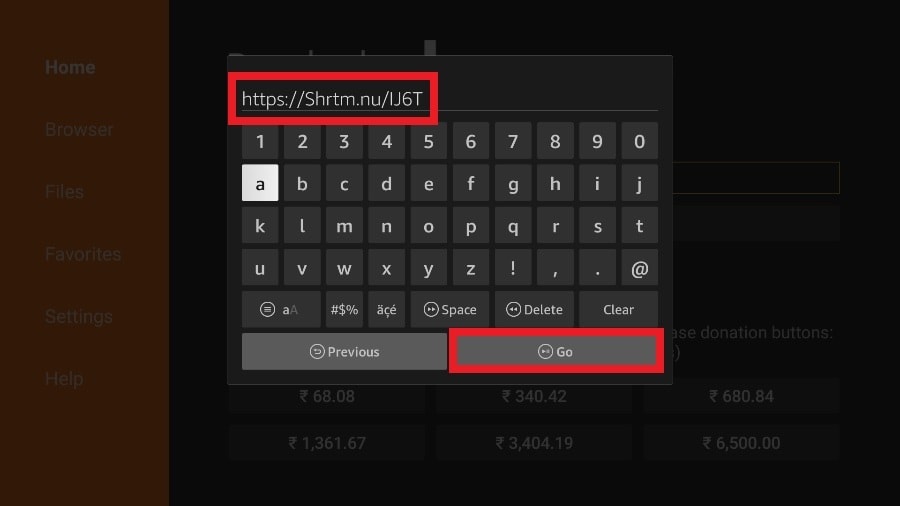
3. It will open a virtual keyboard. Type https://shorturl.at/nrBS9 and hit Go at the bottom.
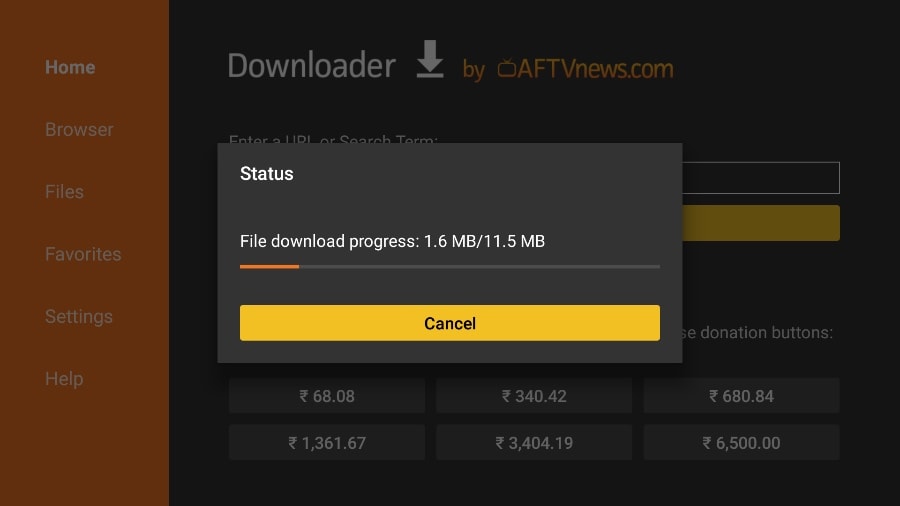
4. Downloader will install the latest TiviMate APK onto your FireStick. It’s about 11MB.
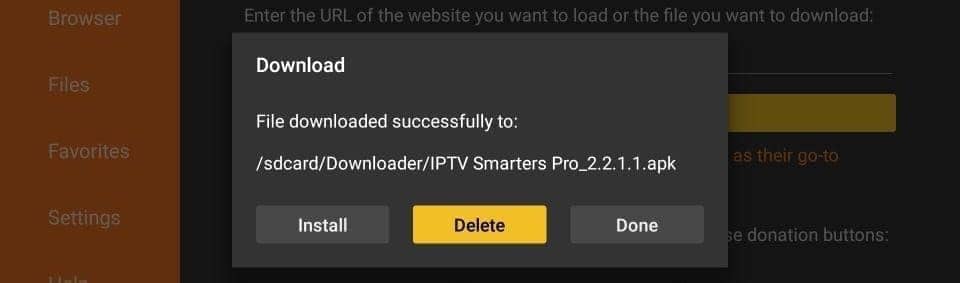
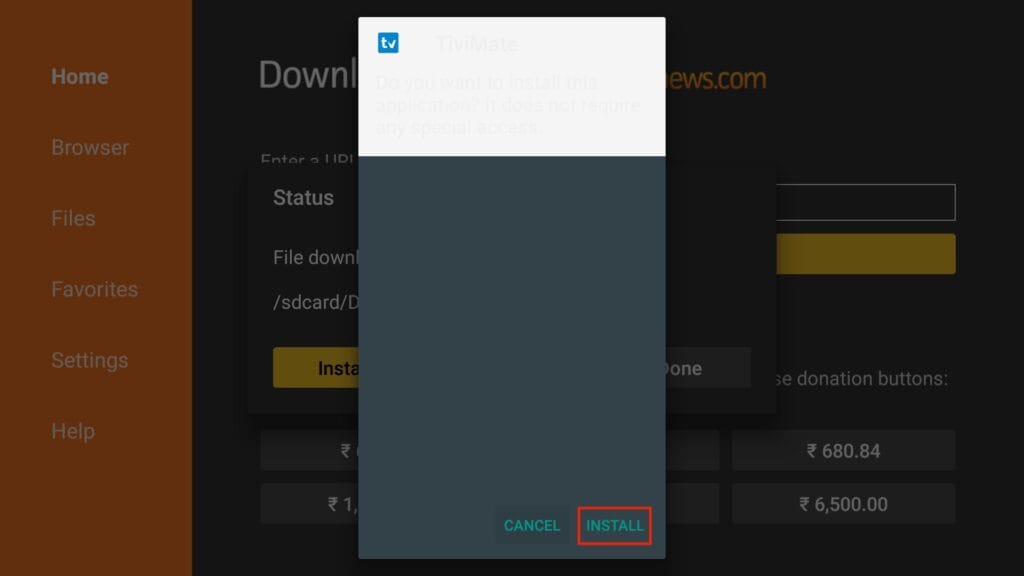
5. Click Install when prompted.
6. After installation, Delete the APK from your device.

I suggest that our readers delete the APK file on the FireStick because it no longer serves a purpose—we’ve already used it to install TiviMate. In general, I advise you to keep your FireStick free from unnecessary files and media. Being low on storage will result in sluggish performance throughout the device.
That’s it, you’ve successfully installed the TiviMate APK on your FireStick. Now you are all set to enjoy hundreds of live channels, movies, and TV series on the FireStick. Before we discuss the app, let’s make a quick adjustment for our convenience.
TiviMate IPTV Player is an addictive app. You are likely to use the app frequently. I advise you to place the app right on the FireStick home screen for easy access. Go through the steps below to do so.
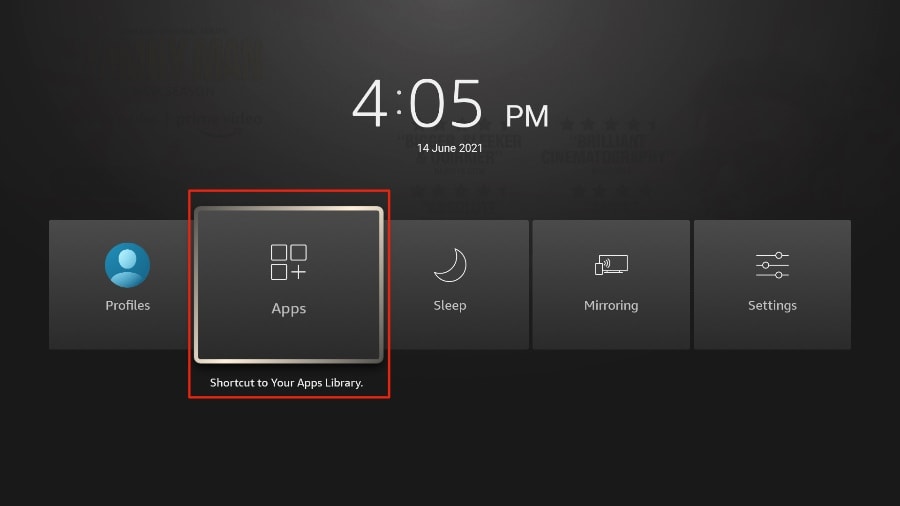
1. Press and hold the home button on your FireStick remote.
2. Select Apps on the following screen.
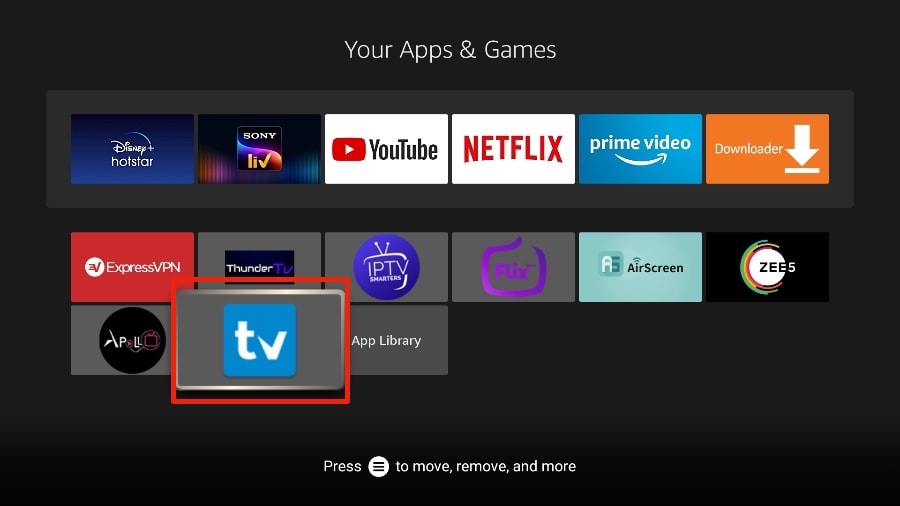
3. Scroll to TiviMate IPTV Player but do not select it. Instead of selecting it, press the options button on your FireStick remote.
4. You will find the Move option on the right side. Select it.
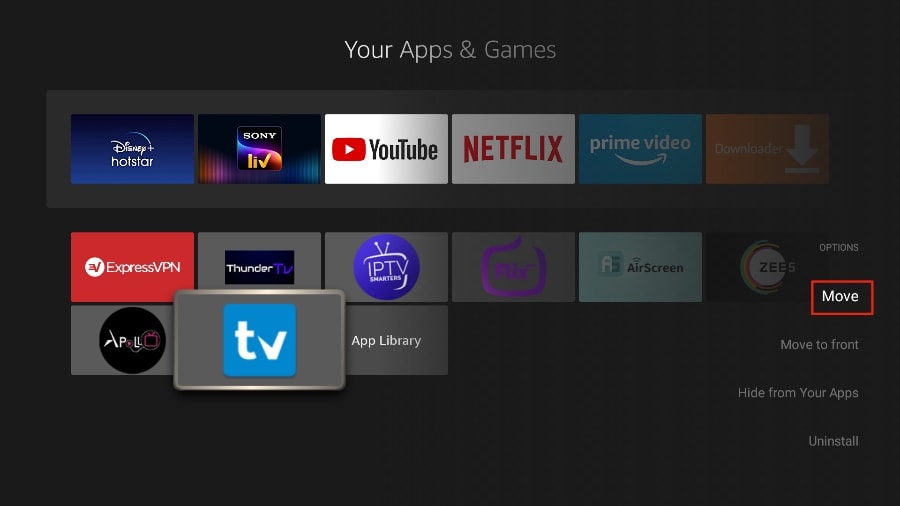
5. Move TiviMate to the top row, then press the select button on your remote to confirm the new location.
6. Now you can comfortably access TiviMate Player from your FireStick home screen. There’s no need to go through a menu each time.
Apple / IOS
1st Application : Smarters Player Lite
How to setup IPTV on Apple / IOS with Smarters Player Lite
Step 1: Start by downloading Smarters Player Lite app from the Apple Store this URL : https://apps.apple.com/in/app/smarters-player-lite/id1628995509
or you can search for it on App store
install the app on your IOS device.
Step 2: Open the app once downloaded and Enter the login details.
Step 3: Enter the login details that we have provided you after you get a subscription with us
Now Click on “ADD USER” to proceed to the next section.
Step 4: Wait some seconds.
Step 5: Now click on “Live TV” icon as depicted in the image via a red arrow.

Step 6: Now you must select the channel group that you want to watch and proceed to the next section.
Step 7: Now you must click on the channel name and then double click on the small screen to turn into full screen as the final step.
Step 8: To add EPG no need to add any EPG url, Just click on “Install EPG” .
Done
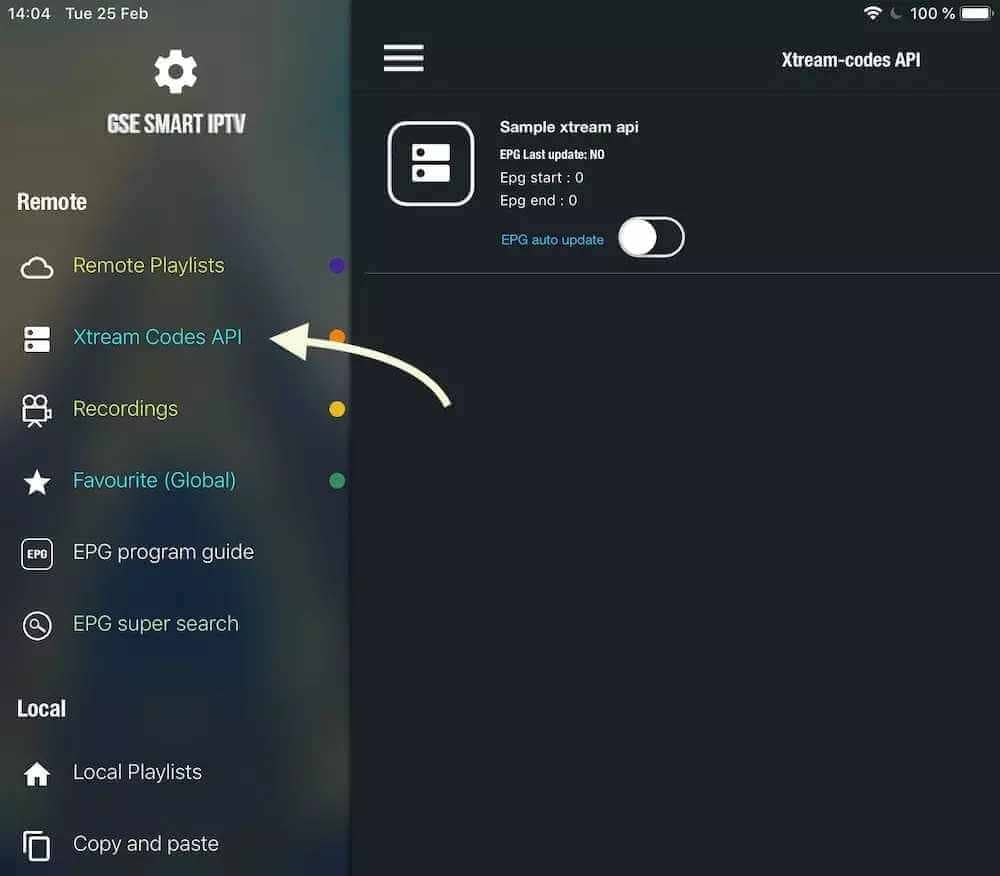
2nd Application : GSE smart IPTV
GSE Smart IPTV app available for iPhone, iPad, tvOS, and Mac OS X. You can download it from the App store.
Download for iOS devices: apps.apple.com
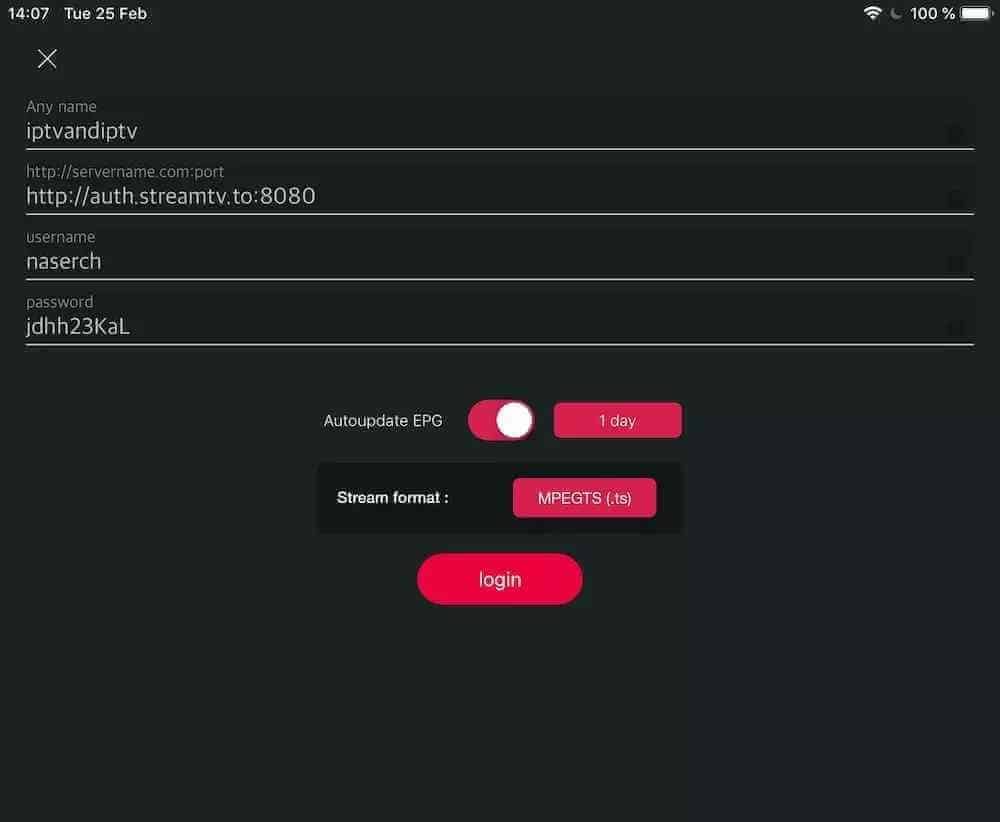
Step1: Navigate to XTREAM CODES API
Step2: Press + icon to add new XTREAM CODES list
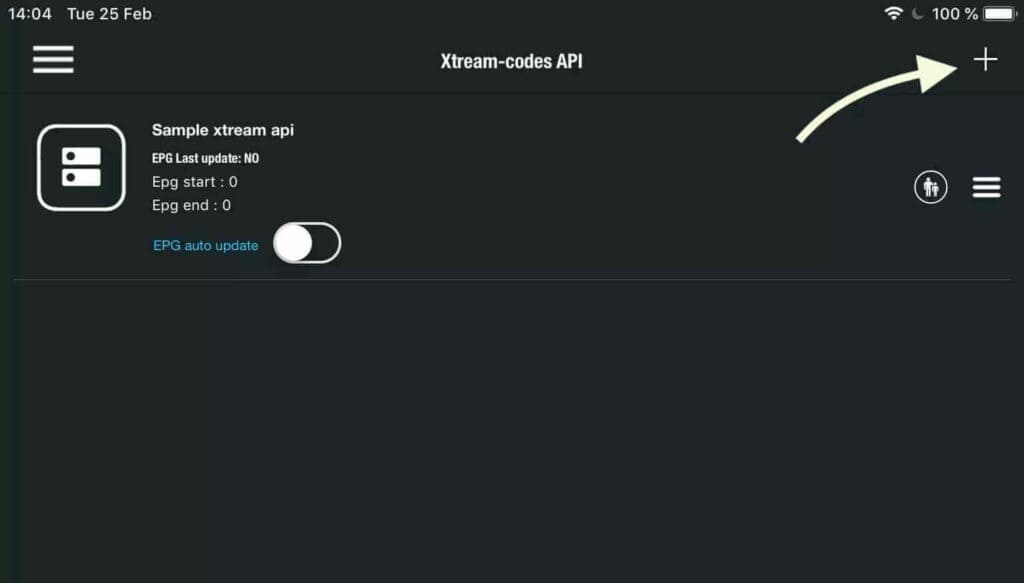
Step 3: Enter Xtream based details
For the first field Choose a name for your list (it can be any name ), Then enter your username, password and URL we provided to you Turn ON Autoupdate EPG and click LOGIN
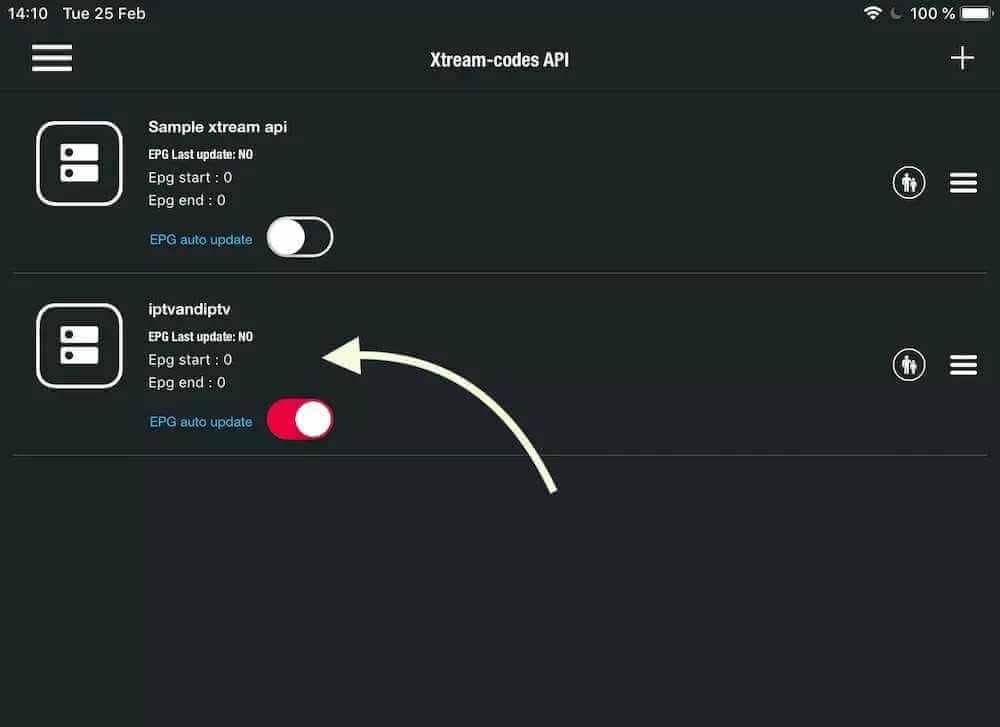
Step 4: Enter the created list and watch movies and live TV channels
Android
How to install IPTV on Android ?
Our service is compatible with any application, and this is the recommendation applications
IPTV Smarters PRO Application
Step 1: Open Google Play Store
Step 2: Search for “IPTV Smarters PRO” or Smarters player lite and install it :

Step 3: Open IPTV Smarters PRO and click Login with Xtream Codes API
Step 4: Enter Xtream connection details
For the first field Choose a name for your list (it can be any name ), Then enter your username, password and URL we provided to you and click ADD USER
Step 5: It will start downloading channels and VOD about 10 seconds then you will be logged in and you will see this page
MAG BOX
MAG Device IPTV Setup Tutorial
This tutorial will guide you through a simple and effective steps of installation your Mag (250/254/256…).
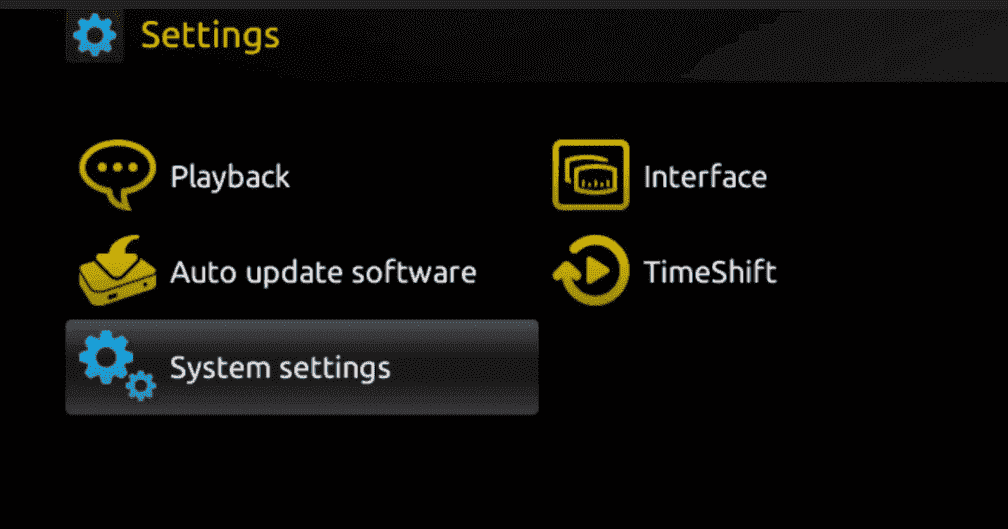
Step 1: When the box is being loaded the main portal screen appears. After that click on “settings”, and press the remote button “SETUP/SET”.
Step 2: Then press on “System settings” and click on “Servers”.
Step 3: Click on ‘Servers’

Step 4: Choose and Press option ‘Portals’
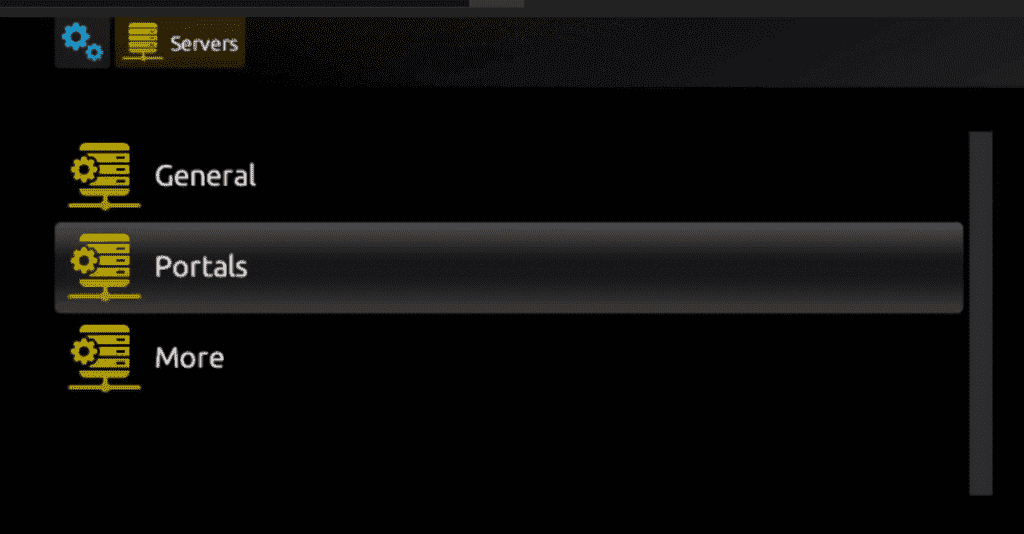
Step 5: In the ‘Portal 1 name’ line enter a portal name and in the ‘Portal 1 URL’ enter portal URL.
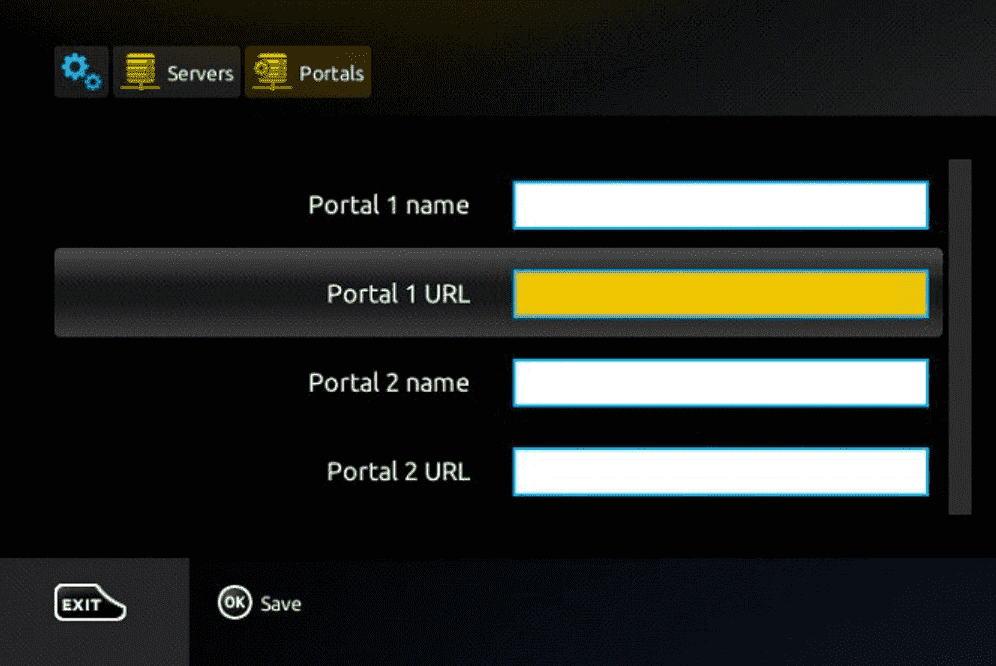
Therefore for the activation of our IPTV subscription on your MAG box, you must send us with your order the MAC address found on the label behind the box, the activation is done entirely remotely, just after activation, we will send you a URL link that you have to put on your PORTAL, as in the photo below:
Step 6: Finally when you complete select and click ‘OK’ to save the changes.
Step 7: Click ‘EXIT’ on the remote control after the settings are being saved.
Step 8: Consequently you have to reboot the box. Choose the option ‘OK’ to make the changes applied.
WINDOWS
Step 1: Open Microsoft Store.
Step 2: Search “MyIPTV Player” in the search bar.

Search My IPTV Player
Step 3: You will find the MyIPTV application in the resultant page. Click on it.
Step 4: Click “Get” button to download and install MyIPTV.

Click Get
Step 5: Once installed, click “Launch” to open the app.

Click launch to open
Step 6: The MyIPTV Player will open.
My IPTV Player
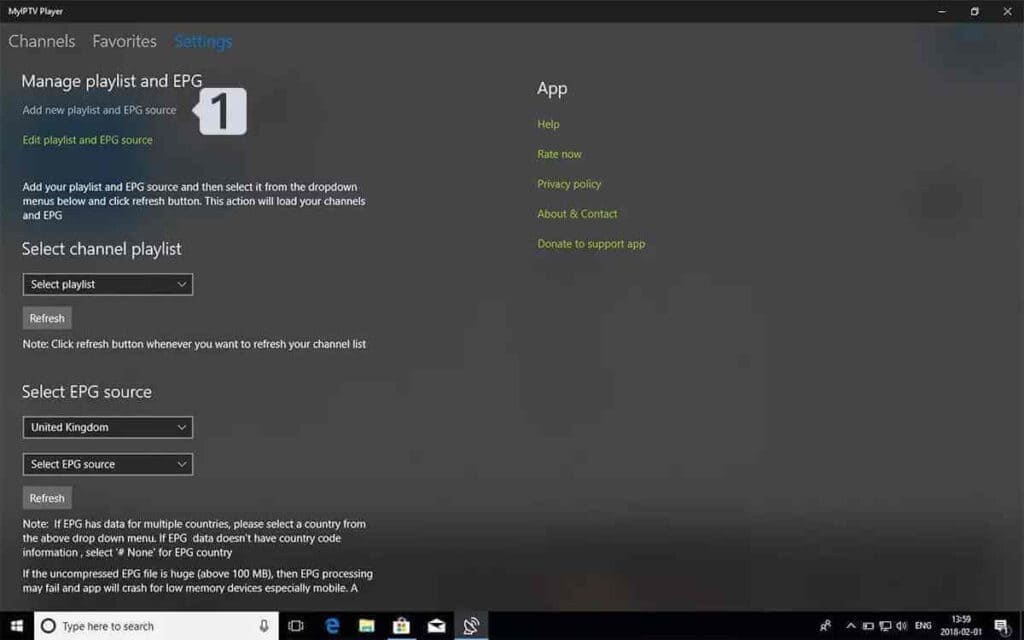
Step 7: Click on “Settings” tab on the application.
Step 8: Click “Add new playlist and EPG source” to add the playlist you have.

Add New Playlist
Step 9: Enter the name of the playlist and click “Select File” to select the file you want to add. After selecting the file, click “Add Local List“.

Select File
Step 10: Then go back to the settings page where you will find the “Select Playlist Channel“. Select the playlist and click “Refresh“.

Click Refresh
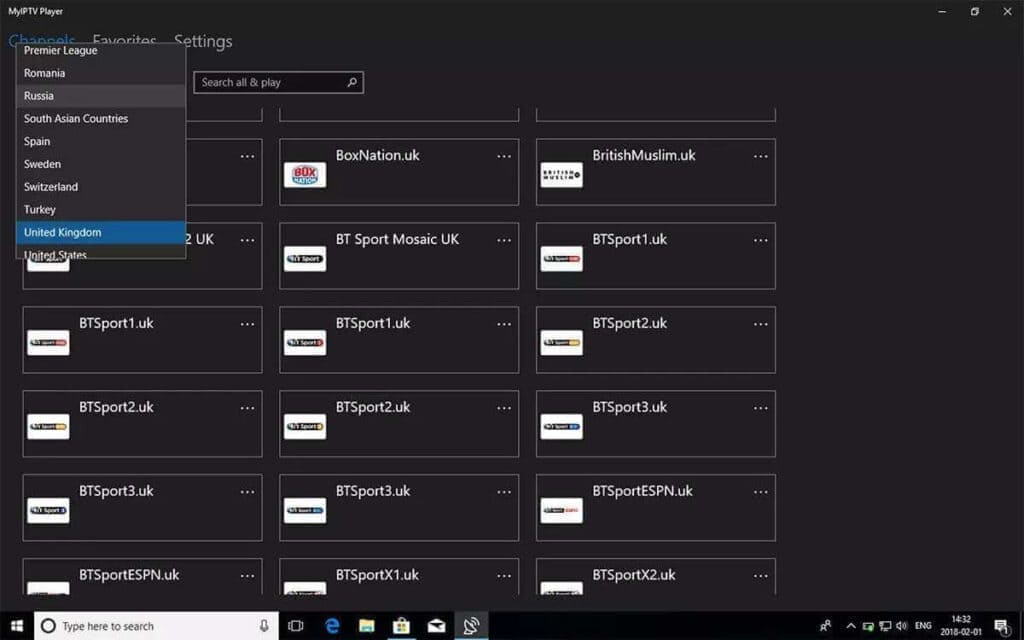
Step 11: Now Click “Channel” tab on the top of the screen.
Choose a channel to Stream
The list of channels will appear. Choose the channel which you want to see and enjoy watching the shows in MyIPTV Player.
MyIPTV Player and Supporting Devices
Here are the devices which support MyIPTV Player:
Windows
Xbox One
Hololens
Windows Phones
STB Emulator
This tutorial will guide you through the simple setup instruction for STB Emulator.
‘STB Emulator’ can emulate the following IPTV set-top boxes.
| IPTV Set-top Box | Support |
|---|---|
| MAG 200 | Yes |
| MAG 245 | Yes |
| MAG 250 | Yes |
| MAG 260 | Yes |
| MAG 270 | Yes |
| MAG 275 | Yes |
| Aura HD | Yes |
STB Emulator Setup Instructions:
- Download ‘STB Emulator’ from the Google Play Store here.
- Install and Load the ‘STB Emulator’ app and you will see your ‘MAC address’ on screen.
- Tap near the ‘Top right corner’ and then click ‘Settings’ – the 4th icon from the right.
- Tap ‘Profiles’.
- Tap ‘Test portal’ to modify the existing profile or ‘Add profile’ to start a new one.
- Tap ‘STB Model’.
- Tap ‘MAG 250’ or whichever STB you wish to emulate.
- Tap ‘Portal settings’.
- Enter your ‘Portal URL’ (Check your activation e-mail) and click OK.
- Now tap ‘Screen Resolution’.
- Choose ‘1280×720’ (You can choose higher with internet speed 16+ Mbps).
- Exit the app and restart.
- You will now see your channel list.
Troubleshooting STB Emulator
If you have any problems viewing the Channels please follow this recommended fix:
Restart your App, Device/Box, and Wi-Fi Router.
MICROSOFT DEVICES
1st Application : IPTV Smarters pro
How to Install IPTV Smarters pro on Windows?
Step 1: Go to the search engine and type in “IPTV Smarters Pro“.
Step 2: Then open the website https://www.iptvsmarters.com
Step 3: Select Downloads in the Menu
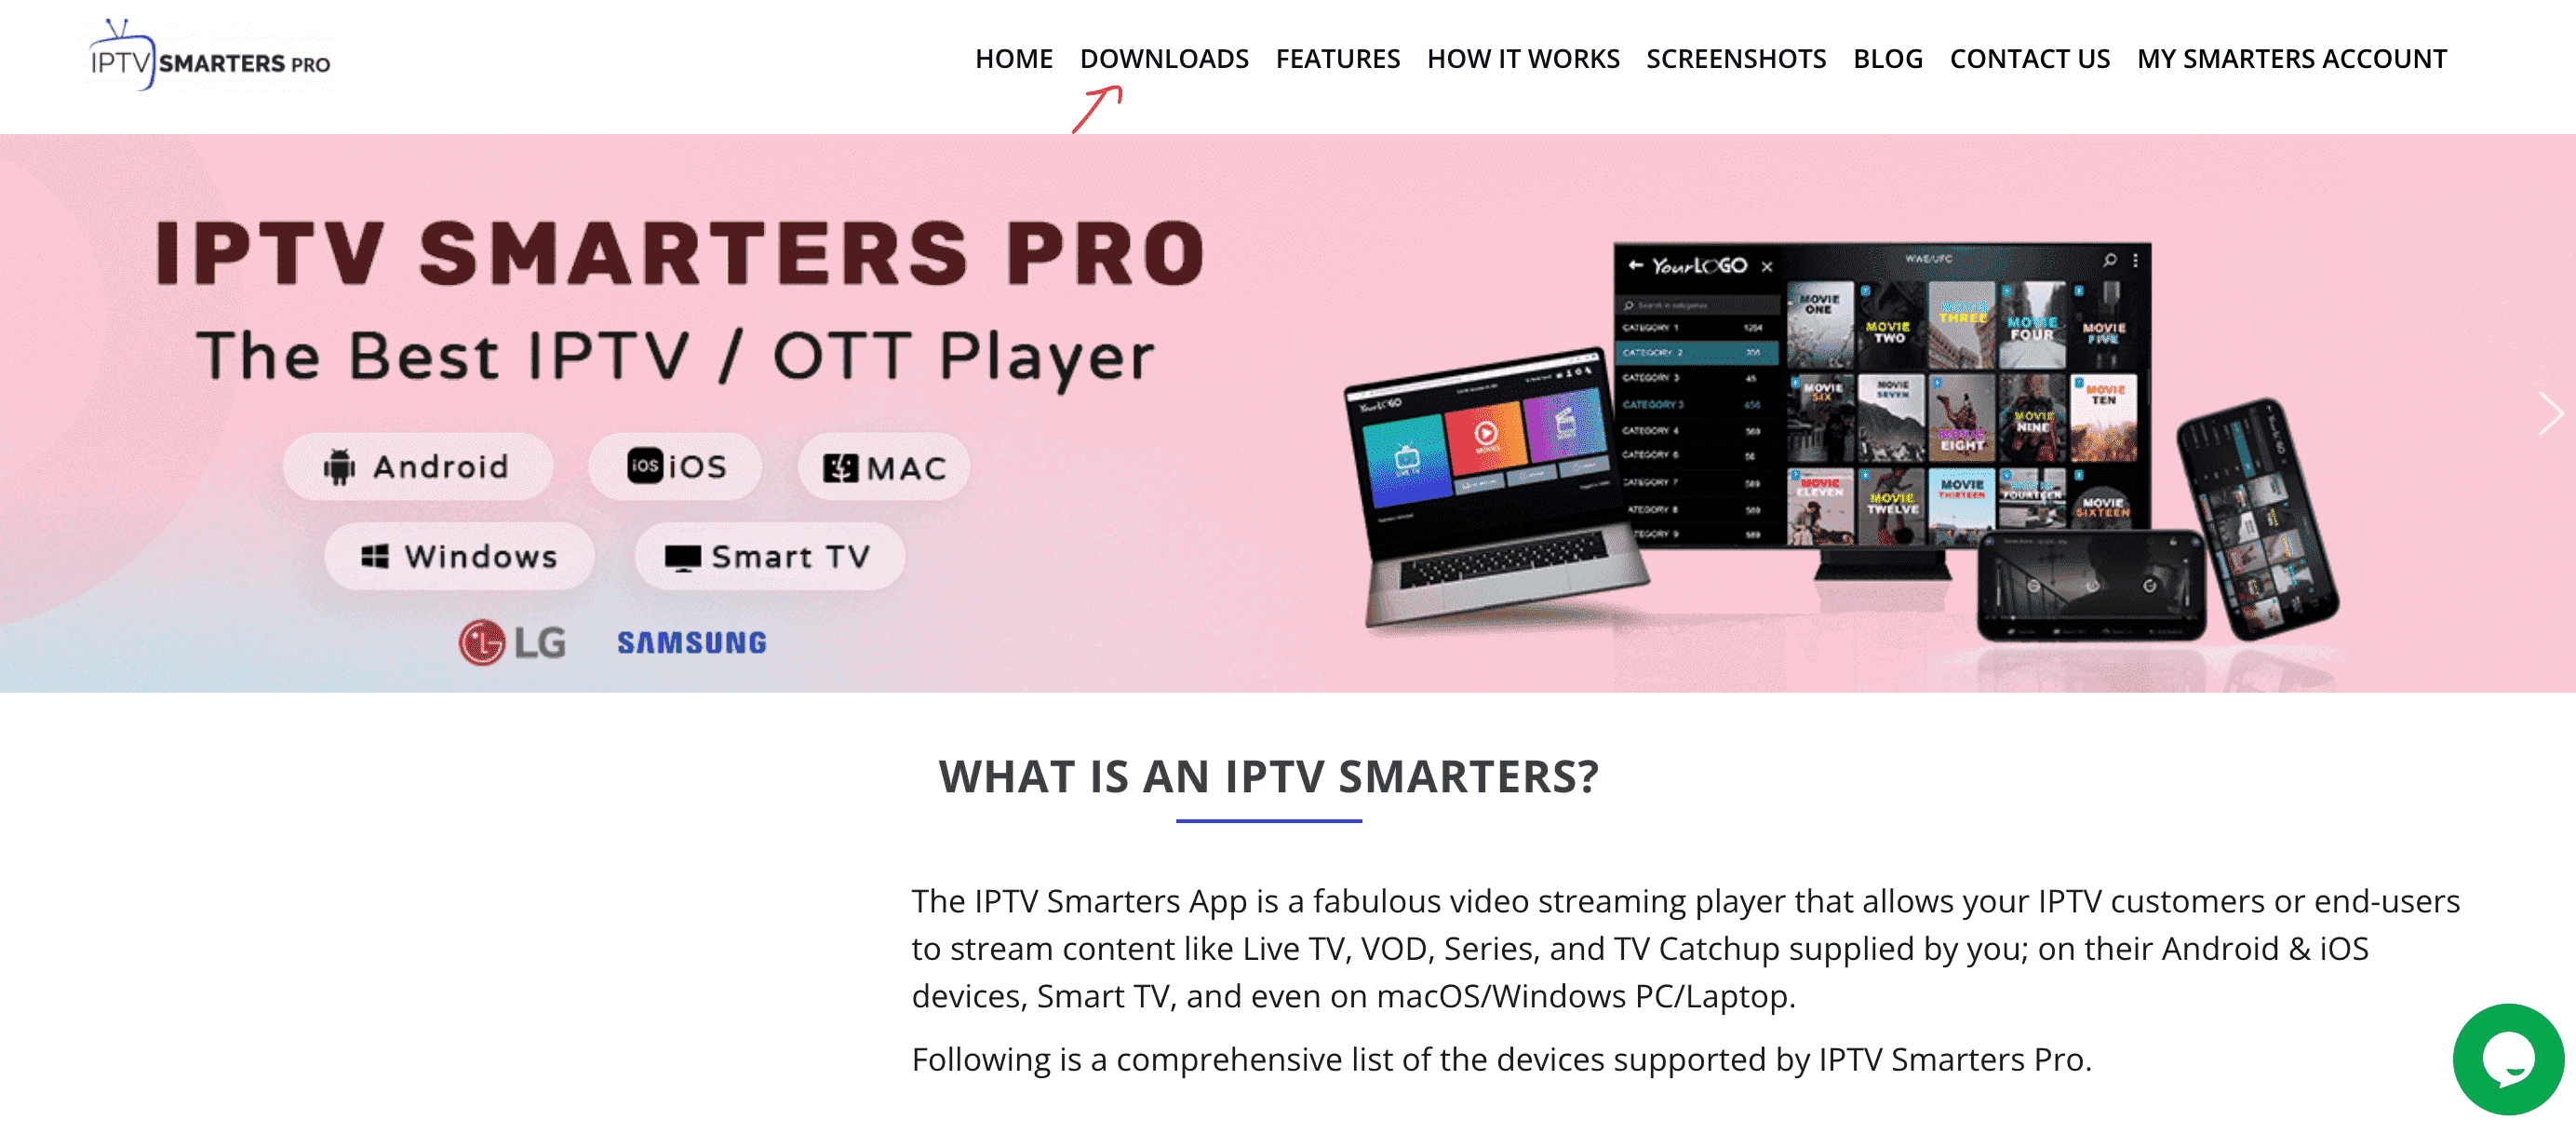
Step 4: Download the new version of IPTV Smarters Pro.

Step 5: After the file download is complete, click on the executable file
Step 6: Windows will ask you for permission to open this file. Select “Yes”
Step 7: The file will now begin the installation process. This should take between – and two minutes
Step 8: Once the installation is complete, start the IPTV Smarters program. Click Add New User and select Login with Xtream Codes API, Add your login data (username, password and Portal URL) for your IPTV service.
Step 9: You are now ready to start watching content on IPTV Smarters Pro!
2nd Application : My IPTV Player
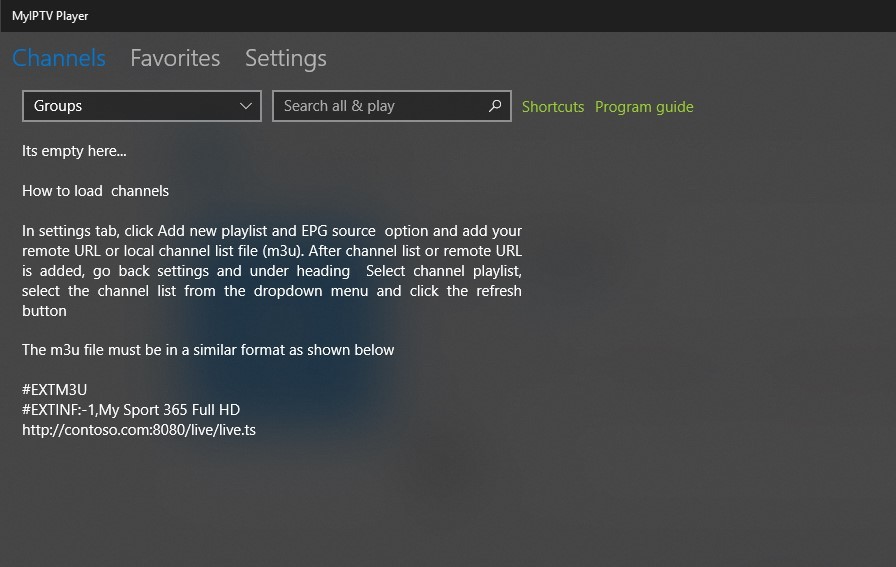
This is an exceptional media player with EPG to play your IPTV channels on your Windows Phone, Windwos10, and Xbox One. You can simply load your M3U playlist from storage or remote source and you are good to go.
You can download this app via the link below:
https://www.microsoft.com/
Step 1: Navigate Settings
Go to the Settings tab and open Add new playlist and EPG source
Step 2: Enter M3u Link
Type a name (ex:overbox) in the Remote channel list name field.
Enter (paste) M3u link provided by IPTV provider in Enter remote source URL
Press Add remote list

Step 3: Select list to load
Back to Settings and select overbox in Select Channel playlist

Step 4: Watch Channels and VOD Done, Back to Channels tab now and select your country you want to watch TV channels.
Dreamlink T1,T1+,T2,T6
This tutorial will guide you through the simple setup instruction for Dreamlink T1, T1+, T2, T6.
Obtaining MAC address from the device:
- Let the STB Boot Up.
- Finish any update that it may find.
- It will bring you to the ‘Server menu’.
- Press the ‘Exit’ button on the remote control and click on ‘OK’.
- This will bring you to the main DOL screen, the ‘MAC address’ is in the upper right corner.
Dreamlink T1, T1+, T2, T6 Setup Instructions:
- In ‘Dreamlink On Line (DOL) go to ‘Settings’.
- Press the ‘Green’ button on your remote control to pull up the ‘Edit’ option.
- Enter your ‘Portal name’ (use for example: ‘IPTV Shop’).
- enter your ‘Portal URL’ (Check your activation e-mail).
- Confirm, restart ‘Dreamlink’ and start watching.
Troubleshooting Dreamlink T1, T1+, T2, T6
If you have any problems viewing the Channels please follow this recommended fix:
Restart your Dreamlink and Wi-Fi Router.
Openbox
This tutorial will guide you through the simple setup instruction for Openbox.
Openbox Setup Instructions:
- Open ‘Intenet Browser’.
- Copy and paste your M3U URL into the ‘Address bar’ and press ‘Enter’.
- It will ask you to either ‘save’ or ‘save as’.
- Choose ‘save as’ and change the file name to ‘IPTV SHOP’.
- Copy the saved file from your computer to a USB stick then put the stick in the Back of the Openbox.
- On the remote press the following:
– MENU
– Network Local settings
– Network App
– IPTV SHOP
– Yellow button to read from USB
– Start Watching right after Openbox says ‘success”
Troubleshooting Openbox
If you have any problems viewing the Channels please follow this recommended fix:
Restart your Openbox and Wi-Fi Router
Avov Box/Formuler
This tutorial will guide you through the simple setup instruction for Avov Box/Formuler.
IPTV SHOP service uses a free media controlled app called ‘TVOnline’.TVOnline Setup Instructions:
1. From home screen click ‘Market’.
2. Click ‘TvOnline’ app.
3. Install ‘TVOnline’ app.
4. Wait for the installation to finish.
6. Enter ‘Server name’ (for example ‘IPTV SHOP’)
and enter ‘Portal link’ (Check your activation e-mail).7. Click ‘Connect’ to start watching.
Troubleshooting Avov Box/Formuler
If you have any problems viewing the Channels please follow this recommended fix:
Restart your App, Avov Box/Formuler, and Wi-Fi Router
ROKU Device
How to Install IPTV on Roku With a Simple Trick
This tutorial provides step-by-step instructions to install IPTV on Roku. Using a Roku device, we must “sideload” IPTV on the Roku device. The instructions below will require the use of a computer in order to download the IPTV app file and add it to your Roku streaming device.
If you are using another IPTV player such as TiviMate, you can also watch IPTV on Roku by casting to your Roku device. IPTV Smarters is one of the best IPTV Players, compatible with hundreds of IPTV services that use a server URL.
Anyways, let’s get into how to install IPTV on Roku. I divided the instructions into four parts to make them easier to follow:
- Part 1: Enabling developer options on Roku
- Part 2: Adding the IPTV Smarters channel
- Part 3: Downloading the IPTV Smarters package on your computer
- Part 4: Installing IPTV Smarters on Roku
Don’t worry, the process is easier than it sounds. Let’s begin.
Enable Developer Options on Roku
1. Launch your Roku by switching to its HDMI input on your television.
2. Grab your Roku remote and press the following buttons in this order: Home Button x3, Up Arrow x2, Right Arrow x1, Left Arrow x1, Right Arrow x1, Left Arrow x1, Right Arrow x1.
3. If done correctly, the developer options menu will appear on your Roku TV screen.
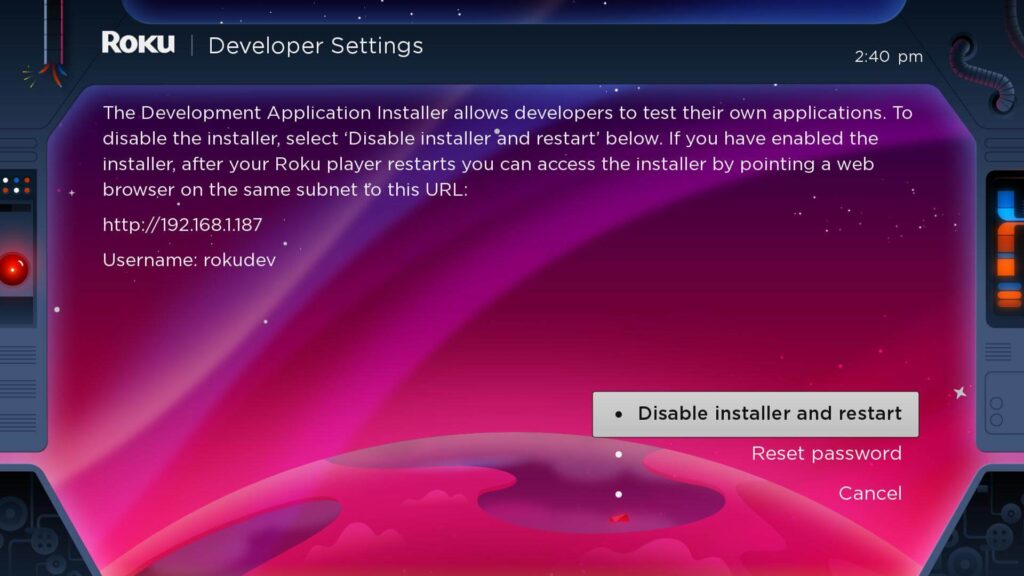
4. Write down the IP address listed on the screen.
5. Select Enable installer and restart (mine says Disable because I’ve already done this).
6. Scroll through the Developer Tools License Agreement and select I Agree.
7. Create a webserver password using the keyboard that appears. You will need your webserver password for a later step.
8. Select Set password and reboot.

Part 2: Add IPTV Smarters Channel
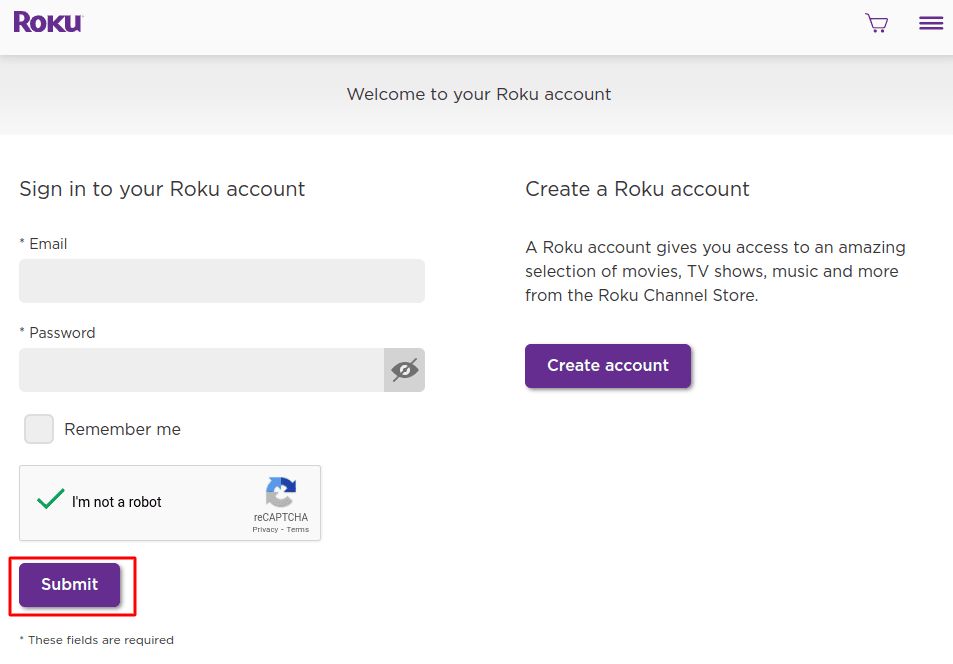
1. Head to your computer and navigate to my.roku.com using any browser.
2. Type in your username and password for your Roku account, and click Submit.
3. Once logged in, select Add channel with a code, under Manage account.
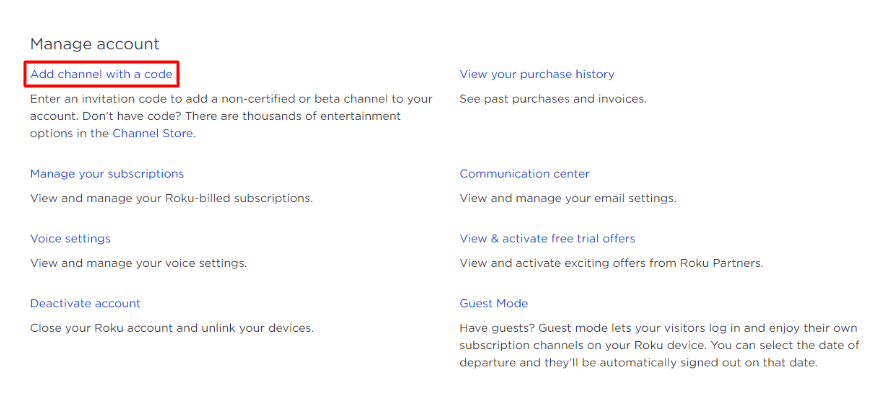
4. Type iptvsmarters into the box. Make sure you’ve typed it exactly as shown.
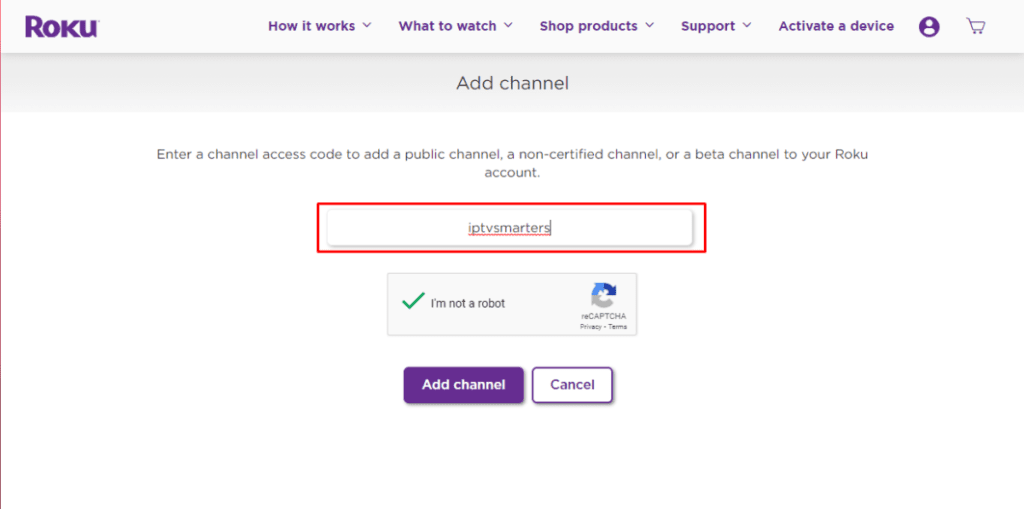
5. Select Add Channel to add it to your Roku.
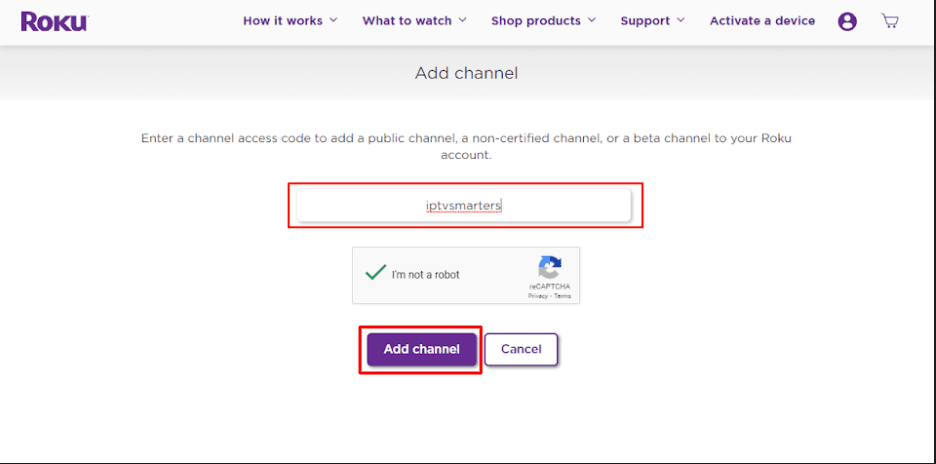
6. Click OK on the warning message that appears.
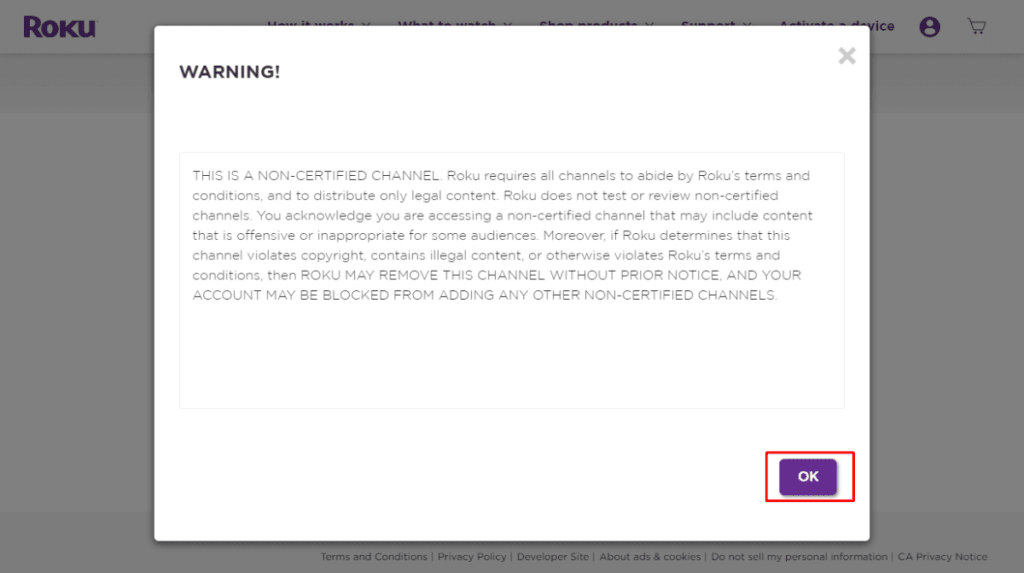
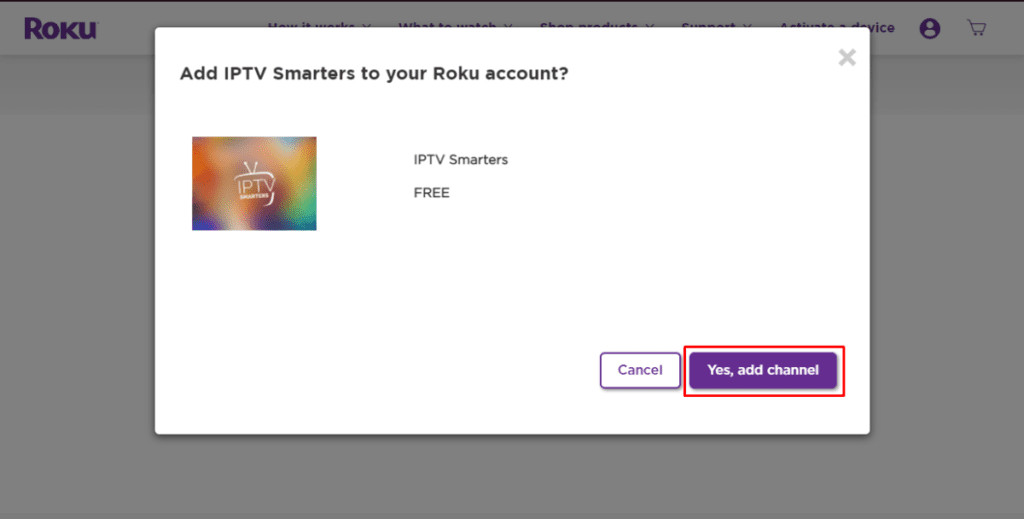
7. Select Yes, add channel on the following popup.
Part 3: Download IPTV Smarters Package on Your Computer
Now, it’s time to download the IPTV Smarters file onto your computer.
1. Head to this link on your computer and the download should start automatically: https://www.whmcssmarters.com/clients/dl.php?type=d&id=108
Note: FireStickTricks.com doesn’t host or distribute this APK. The link leads to the site where it’s hosted.
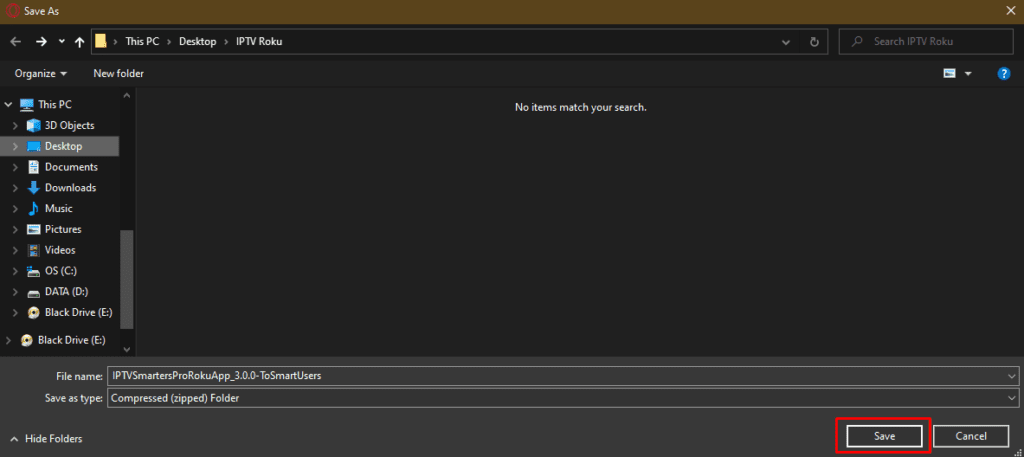
2. Save the IPTV Smarters package somewhere accessible on your computer (you’ll need to browse to this location in a moment). I’m going to save it on my Desktop.
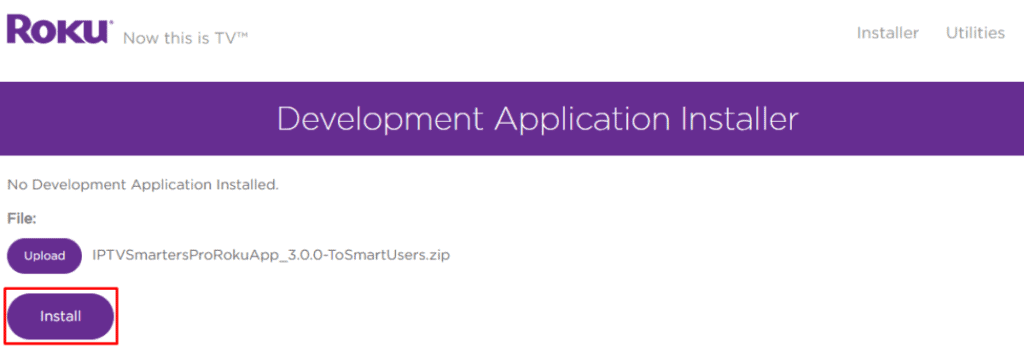
Part 4: Install IPTV Smarters on Roku
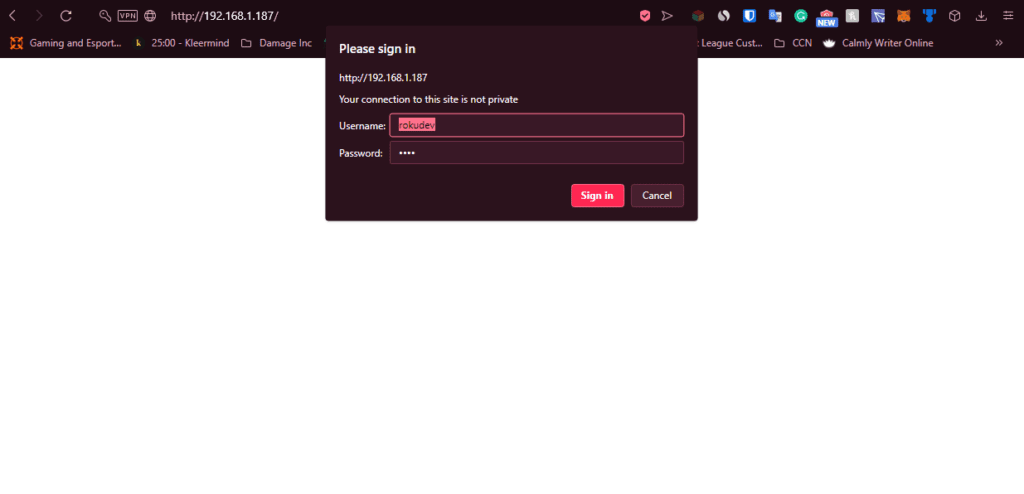
1. On your computer, open any browser. In the address bar, enter the IP address from your Roku that you wrote down earlier.
2. A sign-in box will appear. Type rokudev as the Username. For the Password, type in the webserver password you created earlier. Finally, click Sign in.
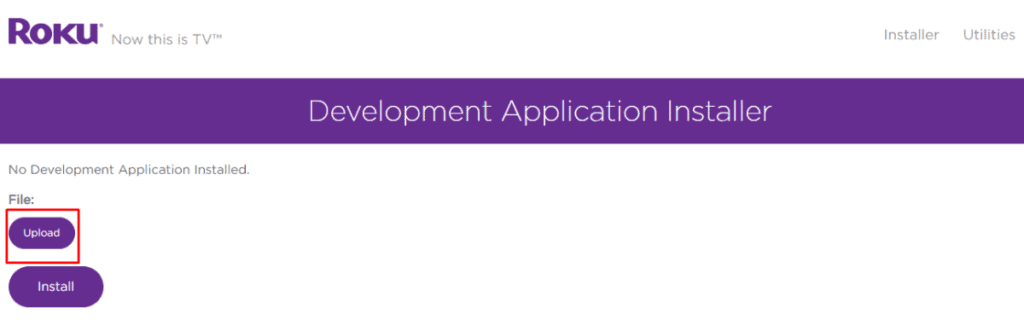
3. Click Upload on the next page.
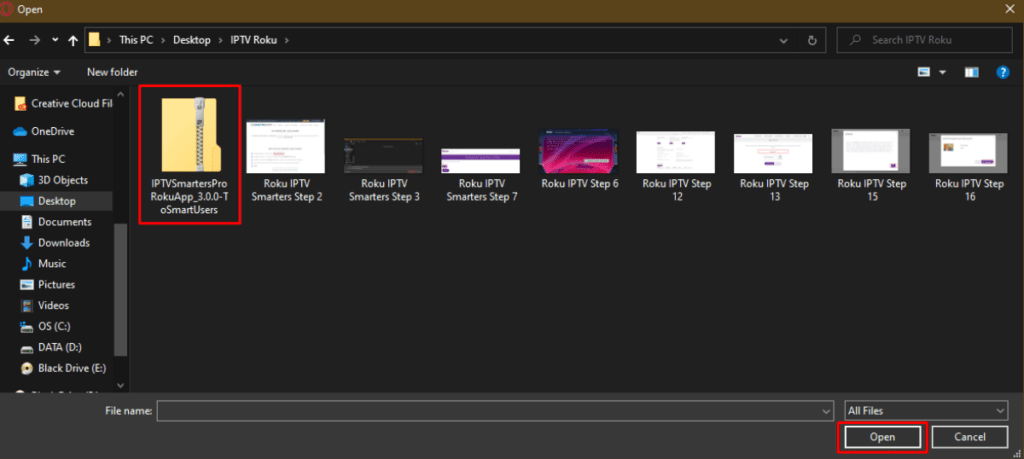
4. Browse to the location where you downloaded the IPTV Smarters package (mine was my Desktop). Select the downloaded folder and click Open.
5. Click Install once the file is uploaded.
6. If you see this screen, you’ve done it correctly!
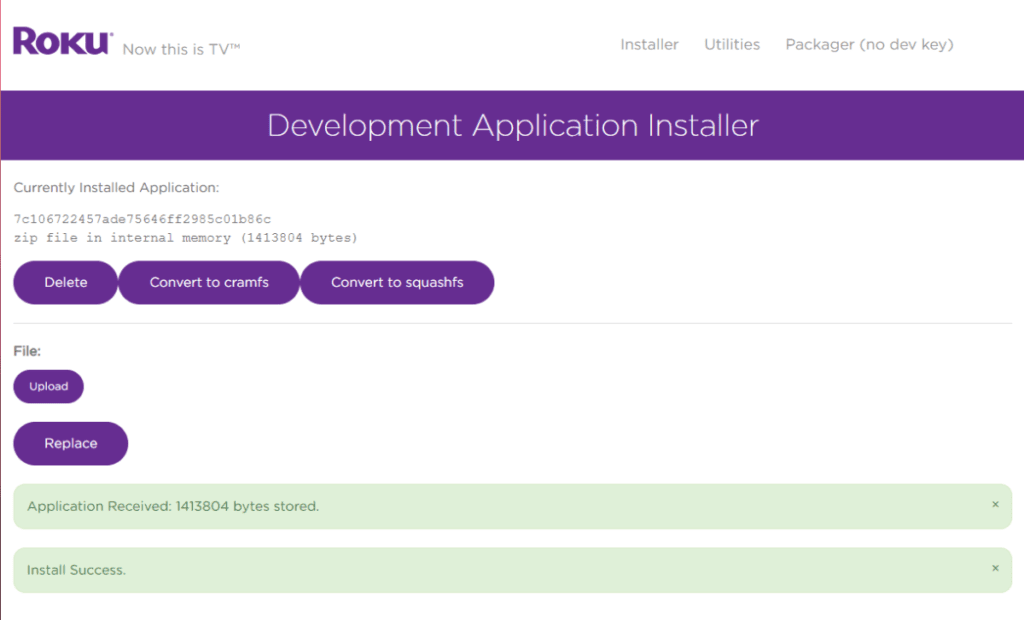
7. Head back to your Roku device, and IPTV Smarters will be on the television.
8. Simply log in with your IPTV Smarters information and you’re in!
Steps to Watch IPTV on Roku Through Screen Mirroring
To stream IPTV on your Roku-connected TV using screen mirroring, you need to install IPTV Smarters or Smart IPTV (a different IPTV player) on your smartphone. Once you have one of these two players, you can use the cast or mirror option on your device.
With the cast/mirror option, you can access content on your Roku TV from any device on the same Wi-Fi network that’s using the IPTV player app.
SONY TV
Install IPTV on Sony Smart TV Using Play Store
Initially, Sony Smart TV had the Android TV OS, and they have shifted to the Google TV OS recently. Both TV OS has Google Play Store for installing the streaming apps, and thereby installation procedure is also the same.
1. Turn on your Sony Smart TV and go to the Apps section.
2. Select Play Store and enter the name of the IPTV on the search bar.
Select Play Store – IPTV on Sony TV
Select play store – IPTV on sony TV
3. Choose the app from the search results and select Install.
4. Wait for the installation to be done, and open the IPTV app.
5. Start streaming the content on your Smart TV.
Install IPTV on Sony Smart TV Using Downloader
Most of the IPTV apps are unavailable in the Google Play Store, then you can install the app using the Downloader app.
1. Launch your Smart TV and select Apps.
2. Open Play Store and click on the Search bar.
3. Search for Downloader and choose the app from the suggestion list.
4. Click Install to install the Downloader app on your TV.
Select Install – IPTV on Sony TV
Select install – IPTV on sony TV
5. Go back to the home screen and select Settings.
6. Select Device Preferences > Security and Restrictions >Unknown sources.
Select Device Preferences – IPTV on Sony TV
Select Device preferences – IPTV on Sony tmTv
7. Choose the Downloader app and turn on the toggle so that you can install apps from unknown sources.
8. Launch the Downloader app and enter the URL of the IPTV apk on the URL box.
Enter the URL
9. Click Go, and the IPTV will be downloaded on your Smart TV. Select Install.
10. Once the installation is done, open the IPTV app and enjoy streaming the content on your Smart TV.
Install IPTV on Sony Smart TV Using USB Drive
You can also get the Apk file on your PC and transfer the file to the Smart TV using USB Drive for installation.
1. Switch on your PC and select the browser.
2. Type the name of the IPTV along with an apk at last, on the search bar. For ex: Smart IPTV apk
3. Download the IPTV apk file from a trusted website.
4. Connect a USB Drive on your PC and move the IPTV apk file to the drive.
5. Disconnect the USB from the PC and connect it to the USB port on the Smart TV.
Connect the USB – IPTV on Sony TV
Connect the USB – IPTV on Sony TV
6. On your Smart TV, go to Settings and select Device Preferences.
7. Select Security & Restrictions. Click on Unknown sources and enable it.
Select Unknown sources
8. Now, move the IPTV apk file on your Smart TV and open the file.
9. Click on Install, and the IPTV app will be installed on your Smart TV.
10. Open the IPTV app and start streaming the content.
Xbox 360 & One
Install MyIPTV Player on Xbox One & Xbox 360
The MyIPTV Player app is one of the best IPTV Players in the Microsoft Store that you can install.
1. Open Microsoft Store on your Xbox One/Xbox 360.
2. Click on the Search tab.
3. Enter IPTV and tap on the Search icon.
4. List of available IPTV apps for Xbox will appear.

5. Click on the MyIPTV player from the list.
6. Now click on the Install button in the Microsoft Store to download the app.

7. Now, the app will get installed on your device.
8. Once installed, launch the MyIPTV Player on Xbox One or Xbox 360.
9. Open the MyIPTV Player and go to the Settings menu.
10. Look for the option Add new playlist and EPG source and select it.

11. Scroll down to the Remote Channels section and enter the playlist name.
12. Add the M3U URL of your IPTV provider and click Add remote list.

13. If you have the EPG source link of your provider, go to the Program Guide (EPG) section and fill in the playlist name.
14. Then, enter the EPG source link of your provider and click Add EPG Source.

15. Navigate to Settings and tap the option Select Playlist displayed under the heading Select channel playlist.

16. Choose the playlist name you’ve added in the previous step.
17. Similarly, select the EPG Source section and select the EPG Source link.
18. Then, move to the Channel and EPG Settings and enable the options listed below.
- Refresh the remote channel list on the app
- Download EPG when no data available on the current data

19. Go back to the home page and click the Channels tab.
20. All the content of your IPTV provider will be displayed on the screen.